Standard Development: Difference between revisions
Chanceness (talk | contribs) No edit summary |
Chanceness (talk | contribs) |
||
| Line 261: | Line 261: | ||
== 4. TC Meeting == | == 4. TC Meeting == | ||
The meeting with TC will be initialized by TS. Click on "" | |||
[[File:TC1.png|center|frame|''Figure :Initializing TC meeting'']] | |||
Click "Ok" to confirm working on TC meeting | |||
Revision as of 08:20, 9 August 2024
1. Proposal initiation and Reference (TS & AMSILE)
Technical secretary will be able to initiate a proposal regarding customers applications as well as internal requirements.
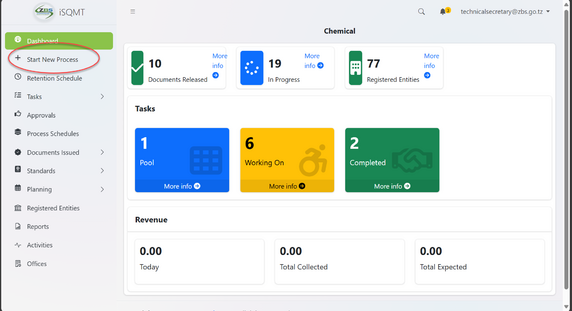
Upon successfully login user will be landed to this dashboard see figure 1.1 (a).
1.1 Proposal Initiation - TS
(a) Click on "Start New Process" to start the process of developing a new Standard.
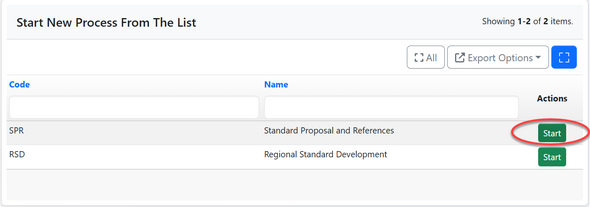
(b) On SPS - Standard proposal and References, Click "Start" to start the process.
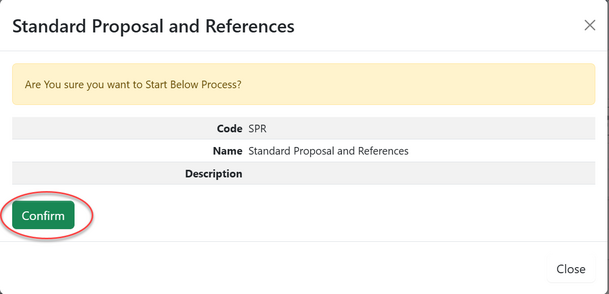
(c) Click "Confirm" to confirm and agree performing the activity
(d) i- Fill in all required details for a proposal
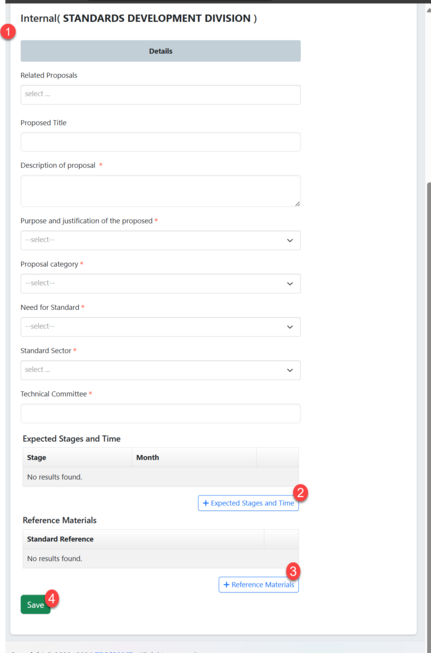
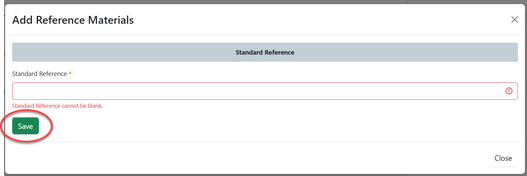
ii-Click on "Add Expected Stages and Time" to add the stage number and month then click "Save" (see figure below)
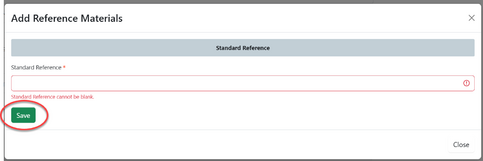
iii- Click on "Add Reference Materials" to add any materials for reference if any and then click "Save" (see figure below)
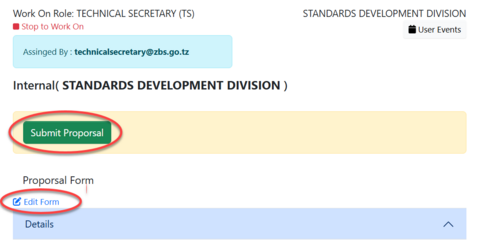
iv -Click "Save" to save details for proposal; on the new tab appear click "Submit Proposal" or Click "Edit Form" to edit details and save by following the same procedure explained above.
1.2 Referencing - AMSILE
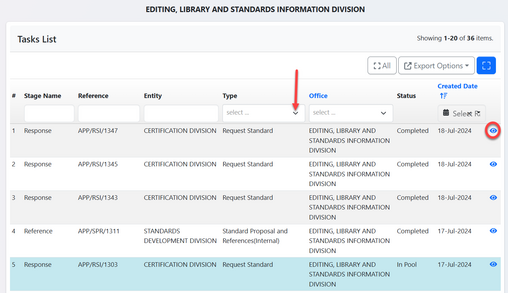
On the list of task Amsile will receive the new application requesting for reference. Click on the intended task or click on the "eye" like symbol to open the application. See figure below.
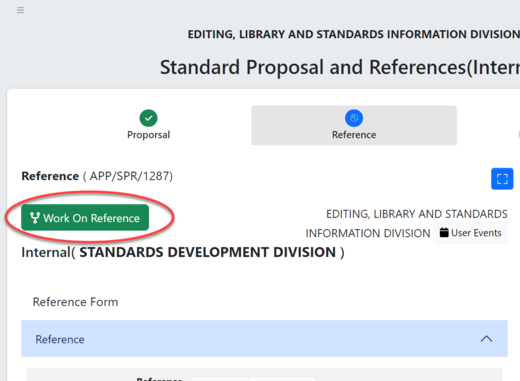
After opening the application and Click on "Work on Reference" as shown below.
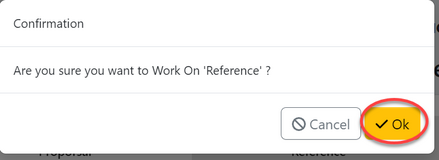
Click on OK to confirm working on referencing.
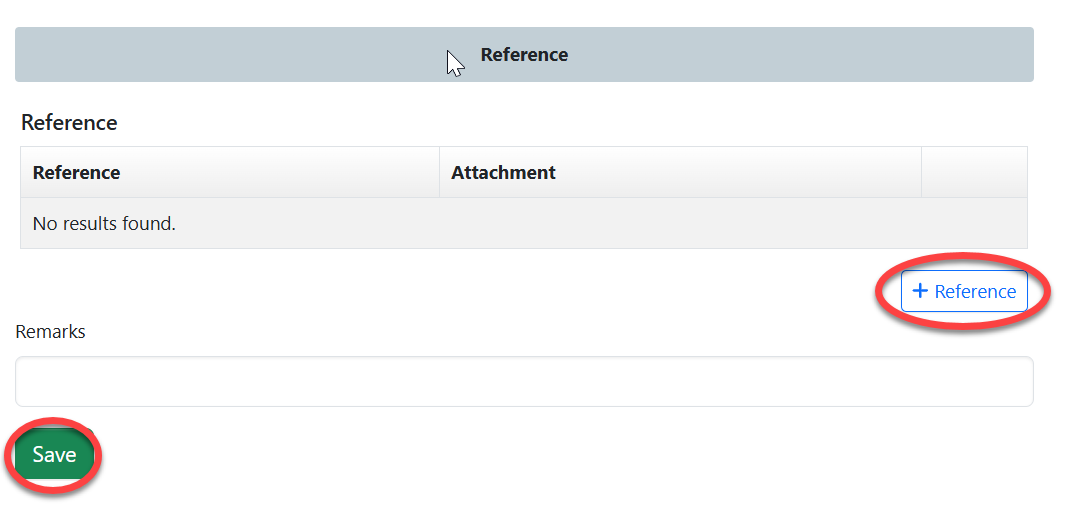
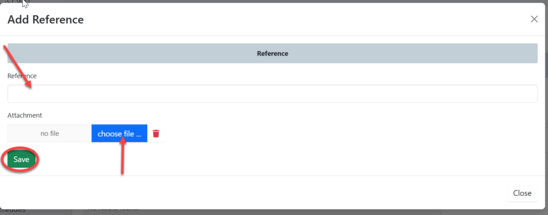
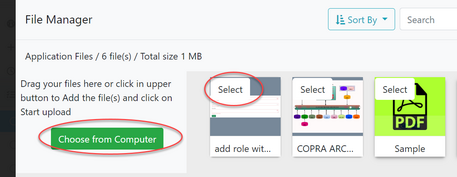
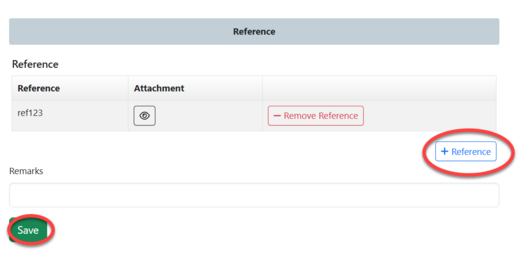
On the appeared window click on "Reference" to add reference as requested on the application details on the summary. Add all required standard references and attachments if any then click "Save", See figure and below.
After filling the required reference click on "Submit Reference" to submit or you can click on the "edit form" to edit the filled details then submit. See figure below.

1.3 Reference Review - TS
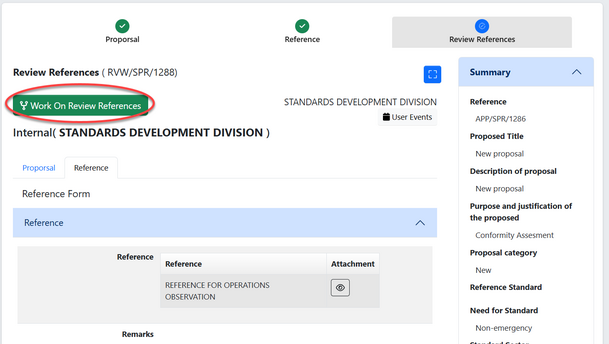
On the task of list TS will click on the application received form Amsile and click on the button "Work on Review Reference" .
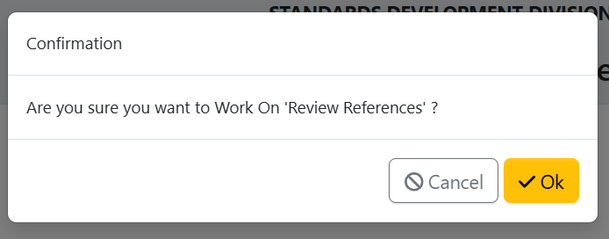
Click "OK" to confirm working of reference review as shown on the figure
On the tab of Reference you can view the details of the reference attached. See figure below.
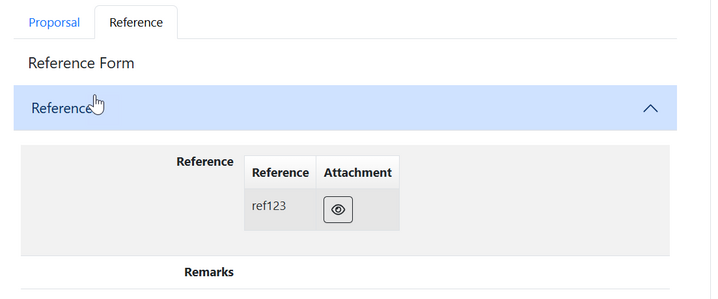
If the details filled regarding proposal are relevant user will click approve to agree or return it to Amsile for corrections. see the figure below.

1)Approve Review  |
2)Return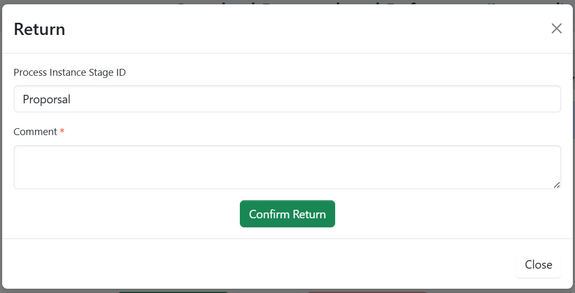 |
2. Working Program (AMSD & TS)
The program is designed to schedule all standard proposals to be developed within a specific timeframe defined by the scheduler. Only approved proposals will be included in this group for DSD and DG approval. In the system the working program has been named as process scheduler.
2.1 Creating Working program - AMSD
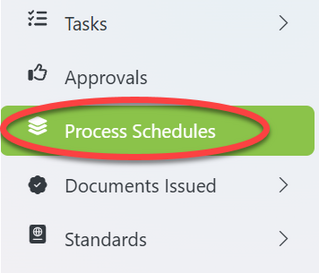
a) Creating Process Schedules - From the list of menus on the left, AMSD should click on "Process Scheduler" as shown on the figure below.
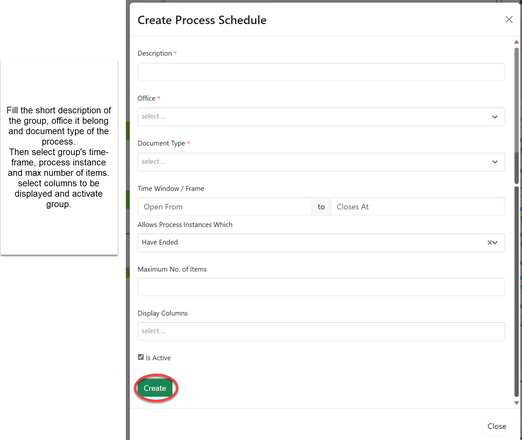
On the window on the right click on "Create" to create a new process Schedules
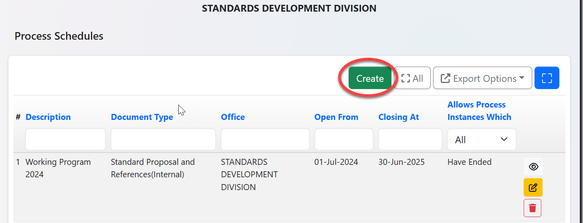
Fill in all the required details and click "Create" to save.
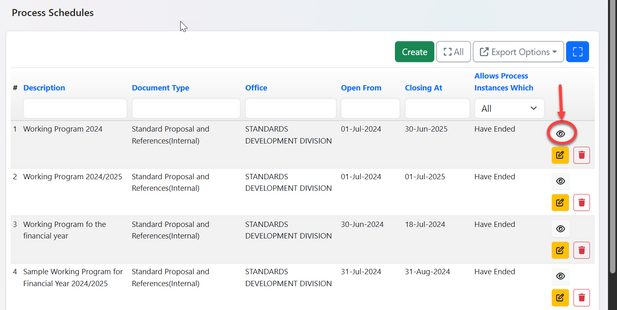
Upon successfully created the program, Open it by clicking on the intended one or click on the "eye" like symbol from the list of process schedules. See figure below
b) Adding Items (Proposals) - The options for updating and viewing items will appear as shown on the figure below.
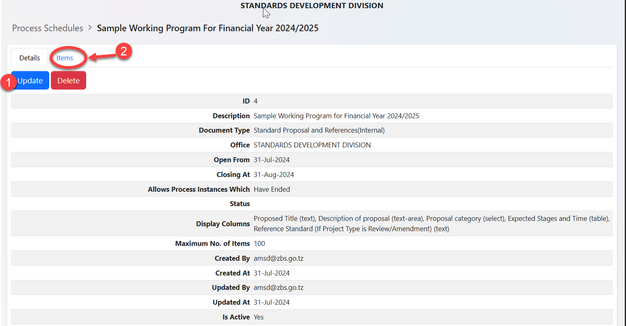
1) Update - Click here to update process schedules details and save .
2) Item - Click on item to add and view items in the program, the items here refers standard proposals.
Upon success full click on "Item", the list of proposals will appear (if any) and the button to add other proposals.

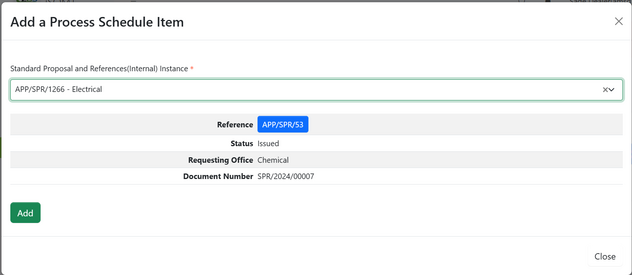
The window with a form will appear for adding item (proposals)

From the list you can select the proposal to be added in the program.
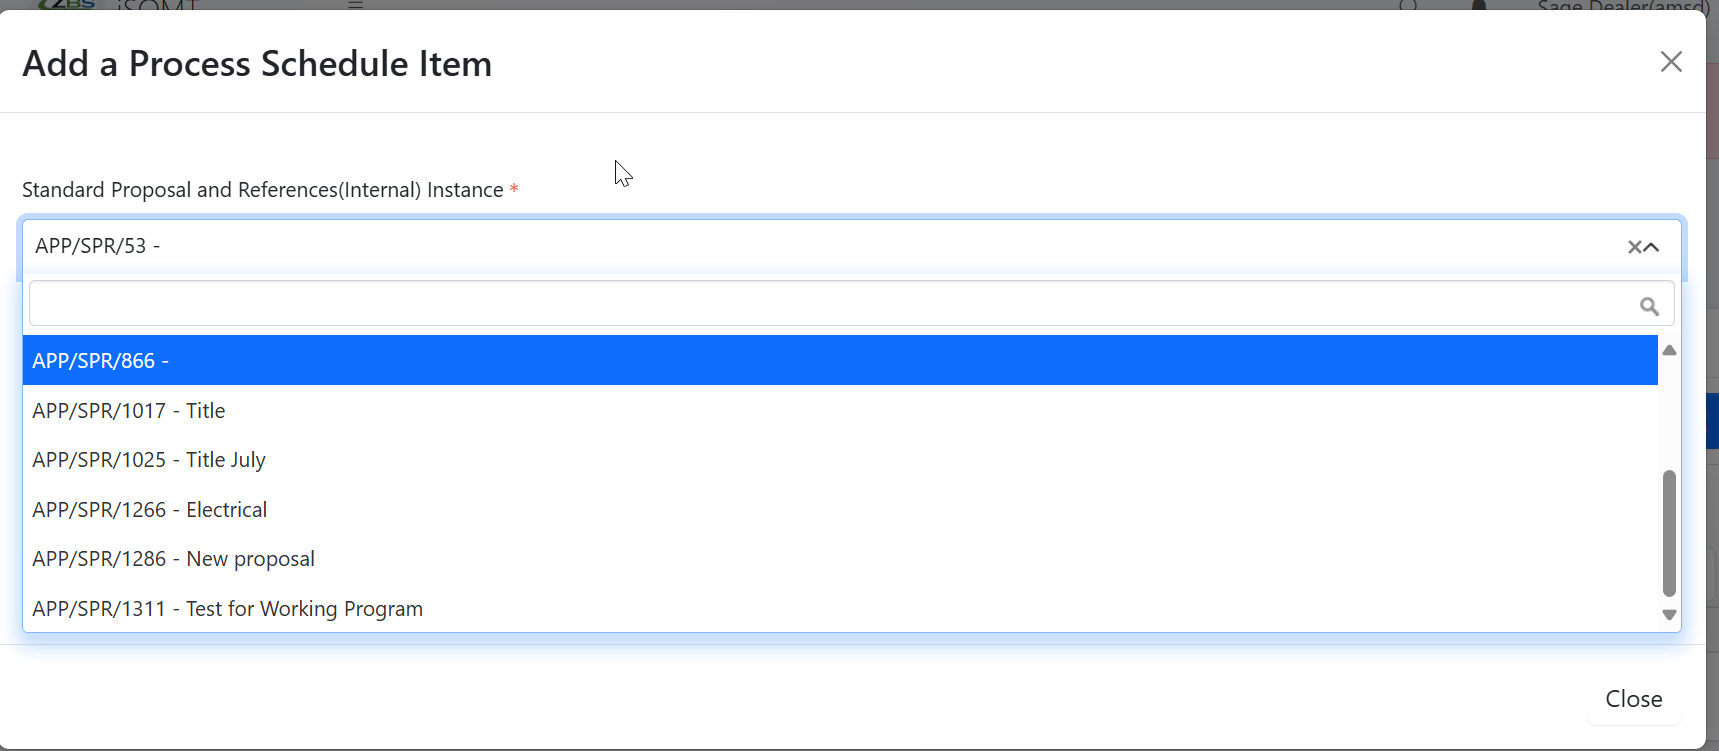
When a proposal is selected, its details will be displayed for AMSD to verify before adding it in the program.
The list of added proposal will appear as shown below where AMSD can view details for each as well as removing them from the working program. (See figure below)
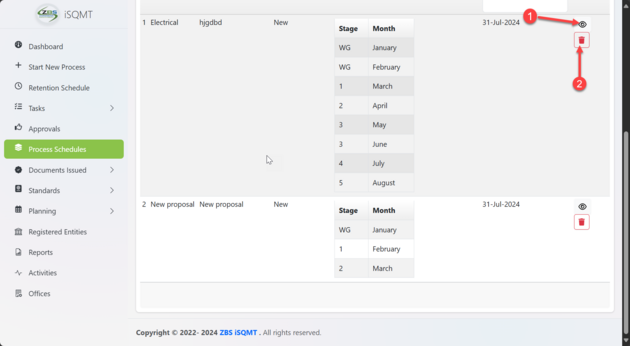 |
1) View details of proposal
2) Remove proposal from the working program |
2.2 Approving Working Program - DSD & DG
After maximum number of items is reached or AMSD willing the group will be closed for DSD and DG approval. After the working program being approved the process of development can proceed as intended.
3. Working Draft - TS
TS in various sectors can access working programs and view the proposals in the working draft with restriction to delete the program.
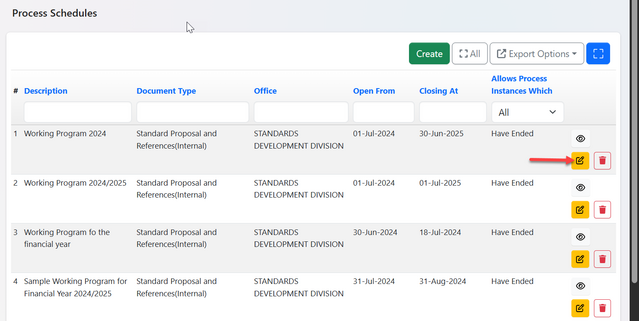
In the working program, TS can add proposals belongs to their designated sectors and only view the proposal's added by others with restrictions to remove or amend. For approved proposals, TS can proceed with initiating a working draft.
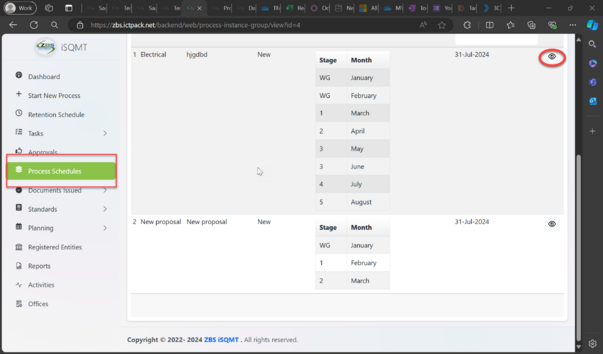
3.1 Initiating Working Draft (TS)
a) Accessing the option to initiate working draft
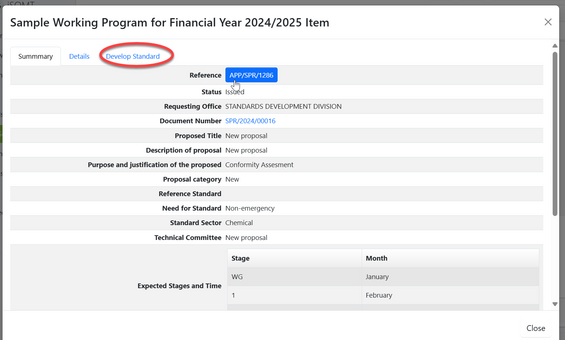
i - From working program click on the intended proposal to develop or click on the "eye" like symbol. The window below will open where user will click on "Develop Standard" (see figure )
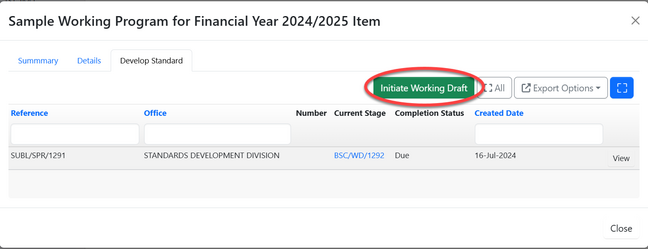
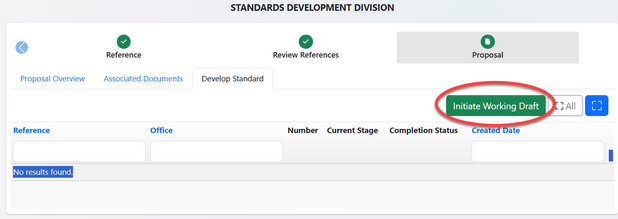
User will be directed to the window with option to initiate working draft click on the button "Initiate Working Draft" as shown on the figure below
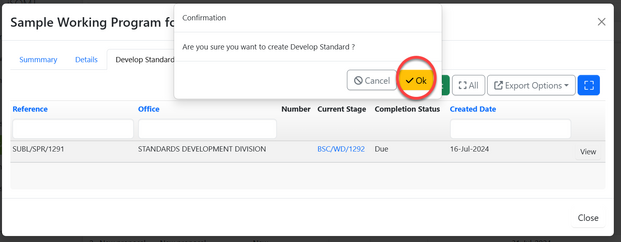
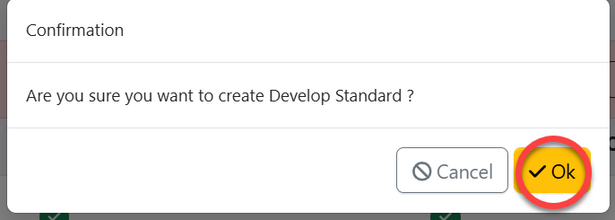
Click "OK" to confirm initiating a working draft.
ii- From the list of task click the the intended proposal to develop or click on the "eye" like symbol.
On the last stage of "Proposal", click on it (See figure )

On the window appeared user can see the document summary of the proposal, tabs for overview, associated documents (if any) and develop standard. Click on the "Develop standard" tab.
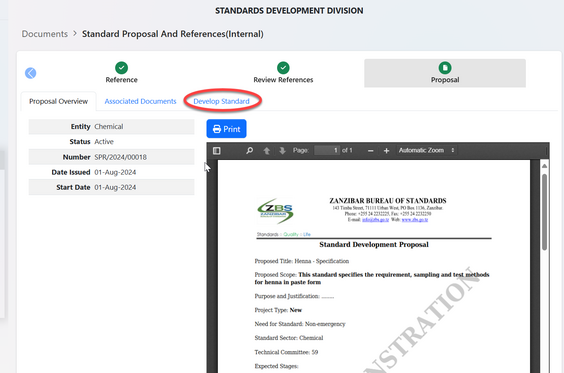
The window to initiate working draft will appear, click on the button "Initiate Work Draft" (see figure below)
Clock "OK" to confirm initiating a working draft
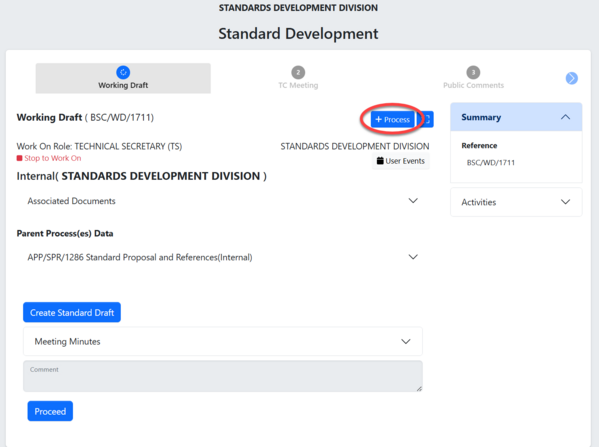
Upon the confirmation to initiate working draft user will be landed on this page to start the draft of standard development.
3.2 Working Group ( TS)
3.2.1 Establish Working group (TS)
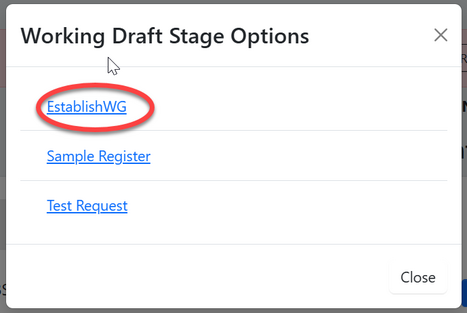
Upon clicking the "Process" user will see stages of working draft click on "Establish WG" to create a working group stage.
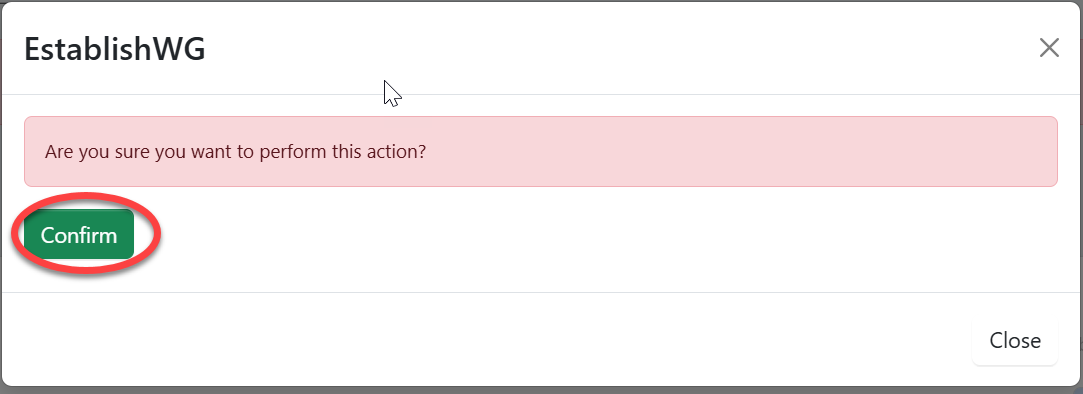
Click "Confirm" to confirm establishment of working group see figure below.
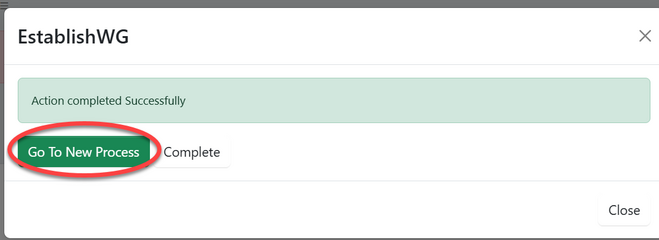
Click "Go To New Process" to start a process for creating working group. see figure below.
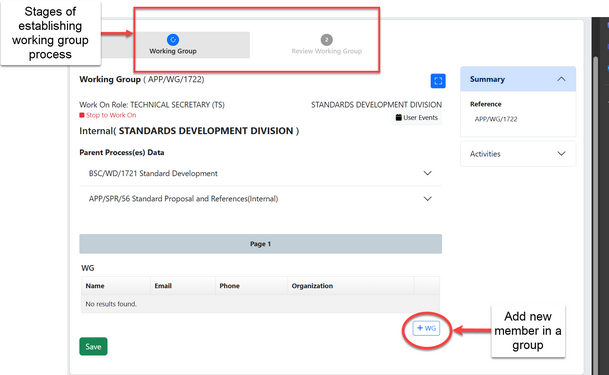
User will be re-routed to the window with the stages of establishing working group (see figure below). To add a new member click on "+WG" button.
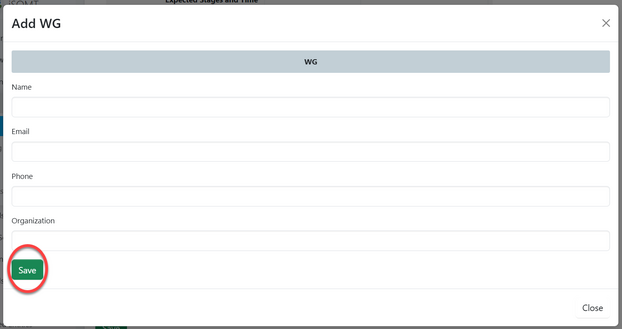
Fill in required details of a member and click "Save" ( See figure below)
In the group user can;
1- Remove Member by clicking "Remove WG"
2- Add member by clicking "+WG"
3- Save members by clicking "Save" (See figure below)
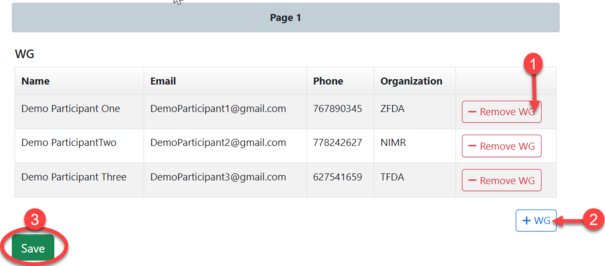
Click on "Submit Working Group" to submit the group or edit form to make some edits, save and submit. See figure below.

3.2.2 Review Working Group (AMSD)
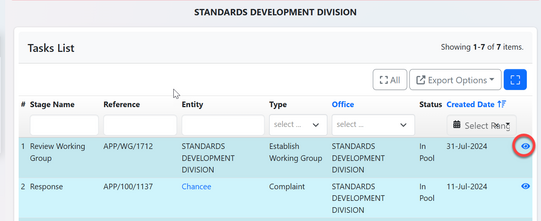
From the list of task click on the intended one or "eye" like symbol to open it.
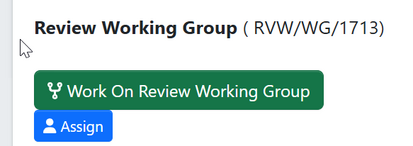
Click on "Work On Review Working Group"
AMSD can see the list of participants and choose to approve or return the working group for improvements.
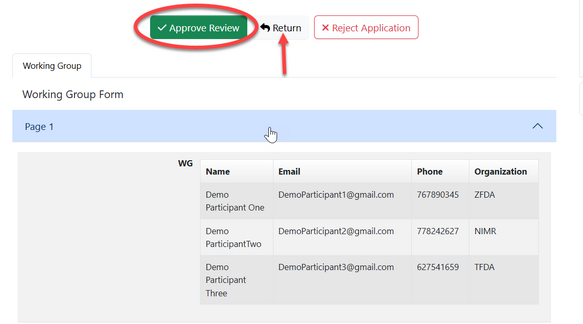
For an approved group the TS will proceed with other stages of working draft.
3.3 Sample Registration (TS)
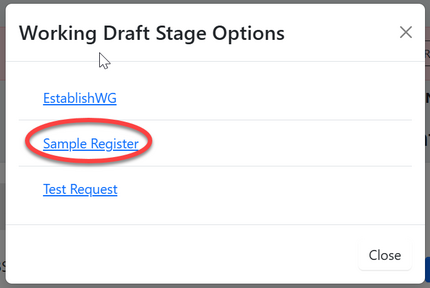
From the list of Working draft stage click on "Sample Register"
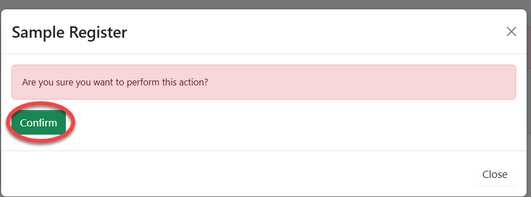
Confirm to work on the sample register by clicking on "Confirm"
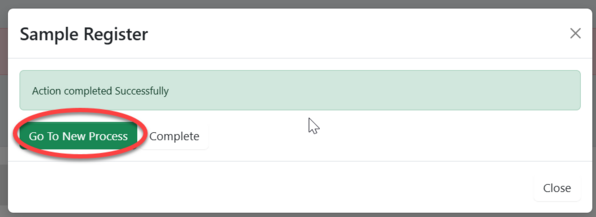
Click on "go to new process" to start the process of sample register
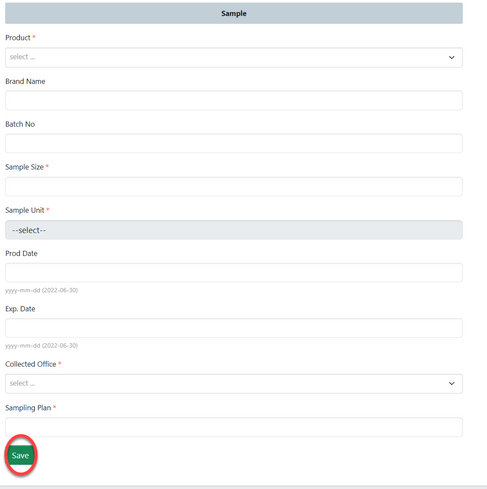
On the form of sample register, fill in the required details and click save see figure below.
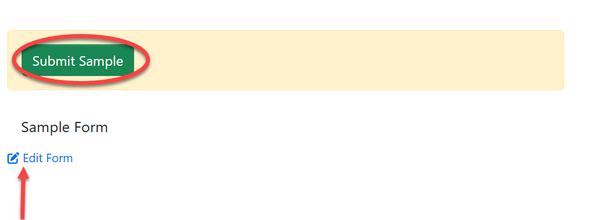
Click on "Submit Sample" to submit sample register or click "Edit Form" to make changes on the form, save then submit. see figure below.
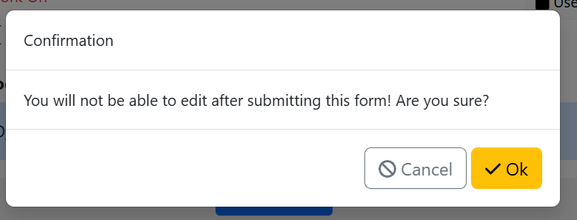
Confirm to submit form by clicking "OK"
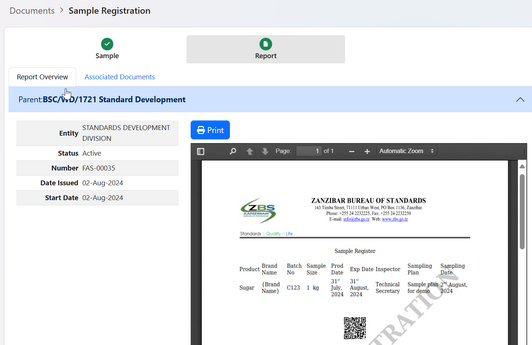
User can see the summary of details of sample registered and can print if wanted. see figure below.
3.4 Test Request - TS & Testing Division
3.4.1 Making a Test Request (TS)
TS should be request for testing in the lab where registered sample will be tested
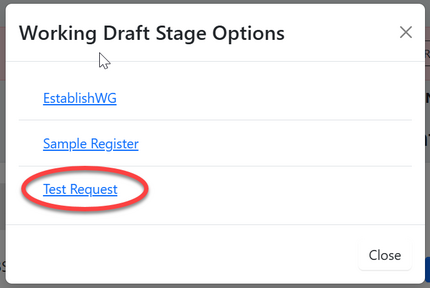
Click on "Confirm" to agree performing test request
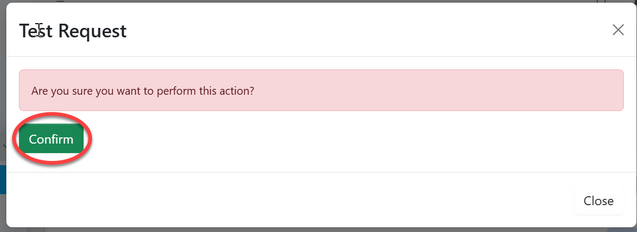
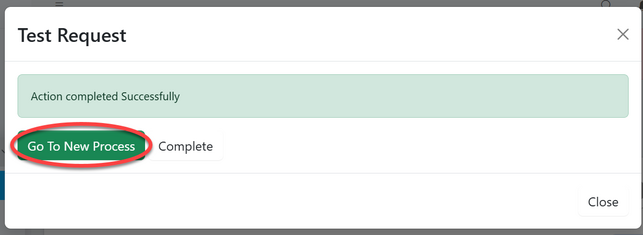
Click on "Go to new process" to start a test request process
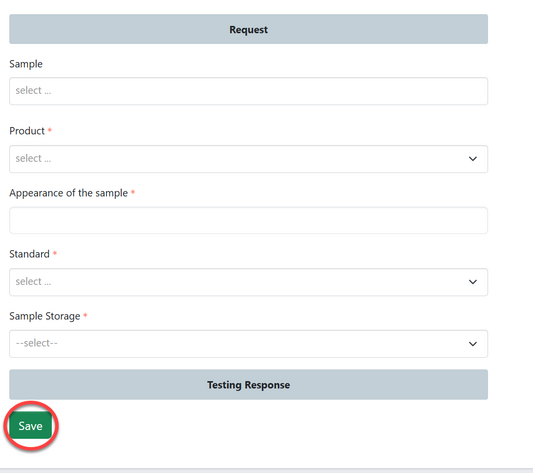
Fill in required details on test request form and click "Save" to submit.
Submit test request by clicking on "Submit Request" or click on "Edit Form" to make amendments if any then save and submit. see figure below.

3.4.2 Responding on Request (Testing Division)
Upon successfully submission of test request, the request will be received by the custodian of the testing division, who will then channel it to the appropriate lab.
Click here to access the guide for the testing division process.
3.4.3 Receiving Test Report
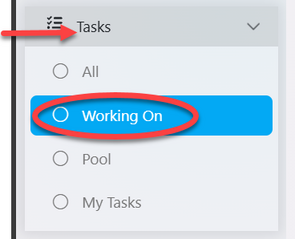
After completion of testing of samples registered, the report will be sent back to TS for review. To access the report TS will click on "Task" then click "Working on" as shown on the figure below.
On the list task user will identify the intended request by searching a number of test request made in the working draft. See figure below. Then click on it or on "eye" like symbol to open.

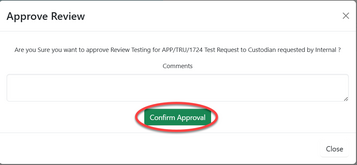
Upon successfully opening it, user will see the test report for review, if satisfied click on the "Approve" to approve or return for improvements.

Then click "Confirm" to confirm receiving the test report.
3.5 Other WD Activities
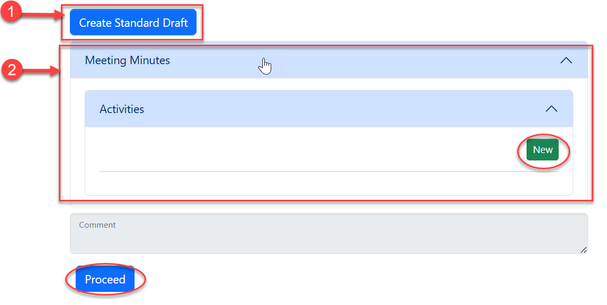
The other activities in working draft includes creating a standard draft as well as registering any other documentation in the system, this major in meetings minutes.
3.5.1 Create Standard Draft
TS can create standard draft by filling in the prior standard details for development. Click on "Create Standard Draft" see the figure above on arrow point 1.
On the form appeared fill in all the required details of standard and click on "save"
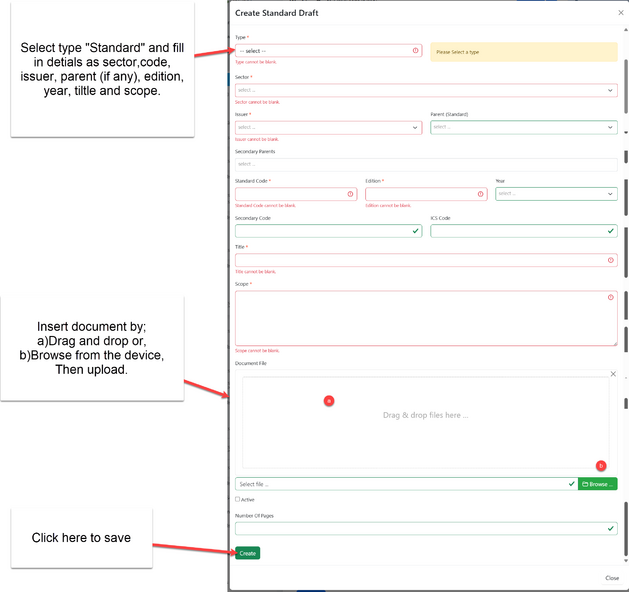
Upon successful filling details and save, user will be directed to the page below (See figure )
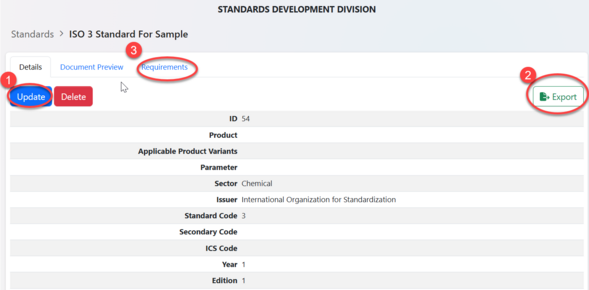
Here user can;
1.Update- edit standard information (2) Export file in excel/CSV mode.
3. Add Standard Requirements.
User can click on "Requirements" to access the addition of requirements to standard.See figure above.
On the window appeared click on "Create" to create a new requirement See figure below.

Adding
From the list of requirements, click on the intended one or click on "eye" like symbol as pointed on the arrow to view requirements details.
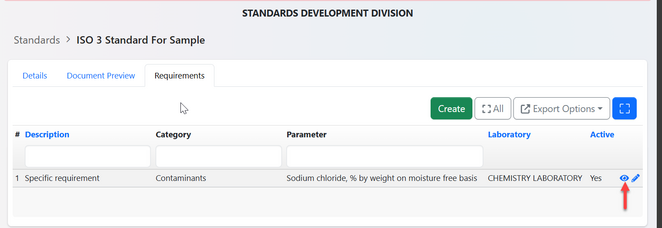
From the window appeared user can view details of the requirements as well as
1)Update requirements details ( See figure below)
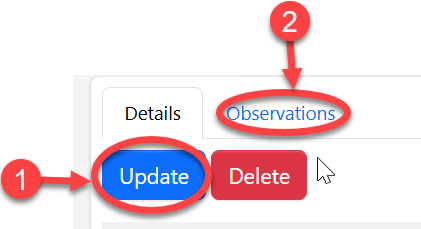
2) Observations - Add observations for requirement.
When the user clicks on 'Observations,' they will be redirected to the observation window, where they can add an observation by clicking "Add" see figure below.

Fill in the required details for observation on the provided form and click "Create" to save. See figure below.
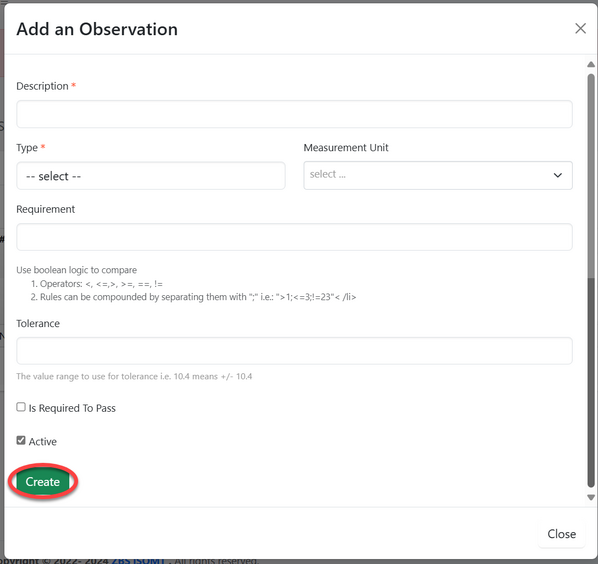
User can add as many observations as required as well as editing them.
3.5.2 Meeting Minutes
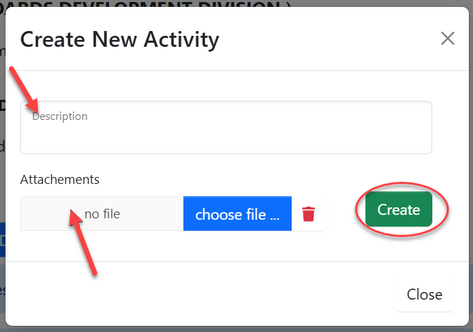
Ts can register in the system other documentation as minutes from the meetings. Click on "Meeting Minutes" --> "Activities" --> New. See figure above on arrow point 2.
Fill in description and attachment if any as shown on the figure below and click "Create" to save. Then close.
Upon completion of all activities in a working draft TS can complete stage by clicking
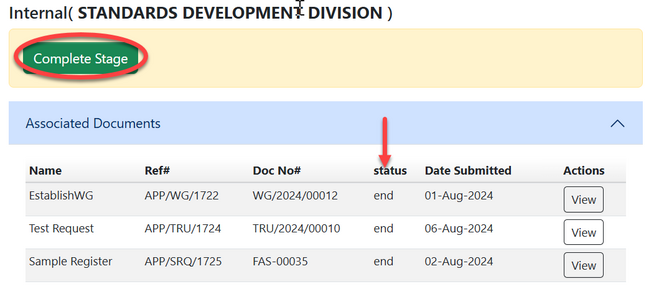
User can proceed with the development only if all process stages are complete.
Then click on "Proceed" to add any other comment obtained through the working draft processes. (See figure above)
4. TC Meeting
The meeting with TC will be initialized by TS. Click on ""

Click "Ok" to confirm working on TC meeting
