Certification: Difference between revisions
Chanceness (talk | contribs) No edit summary |
Chanceness (talk | contribs) |
||
| (4 intermediate revisions by the same user not shown) | |||
| Line 1: | Line 1: | ||
== Certification == | == Certification == | ||
== Product Certification == | |||
When certification officer logged in successful will be landed on this home page - dashboard (see figure below) | When certification officer logged in successful will be landed on this home page - dashboard (see figure below) | ||
[[File:C1.png|center|frame|''Figure 1(a): Homepage/ Dashboard'']] | [[File:C1.png|center|frame|''Figure 1(a): Homepage/ Dashboard'']] | ||
=== Reviewing Application - (Certification Officer) === | === 1.1 Reviewing Application - (Certification Officer) === | ||
On reviewing application certification officer supposed to check for the standard and testing capabilities before approving the application. | On reviewing application certification officer supposed to check for the standard and testing capabilities before approving the application. | ||
| Line 11: | Line 13: | ||
c) Select the intended application to work on by clicking on the application or eye symbol as shown on the figure below. | c) Select the intended application to work on by clicking on the application or eye symbol as shown on the figure below. | ||
[[File:C4.png|center|thumb|626x626px|''Figure 1(d): List of tasks with status'']] | [[File:C4.png|center|thumb|626x626px|''Figure 1(d): List of tasks with status'']] | ||
Click on "Work On Review Application" to get access to work on the application | Click on "Work On Review Application" to get access to work on the application | ||
image* | |||
Click "Ok" to confirm working on Review Application. | Click "Ok" to confirm working on Review Application. | ||
[[File:C6.png|center|frame|''Figure 1(f): Confirm to work on the task'']] | [[File:C6.png|center|frame|''Figure 1(f): Confirm to work on the task'']] | ||
=== 1.1.1 Standard Requesting === | |||
To start a new process click on "Process" to access Review application stage options | To start a new process click on "Process" to access Review application stage options | ||
[[File:C7.png|center|''Figure 1.1(a): Start a new process as a part of reviewing application'' |alt=Figure 1.1(a): FGHJK|frame]] | [[File:C7.png|center|''Figure 1.1(a): Start a new process as a part of reviewing application'' |alt=Figure 1.1(a): FGHJK|frame]] | ||
| Line 28: | Line 32: | ||
{| | {| | ||
|[[File:C9.png|center|thumb|651x651px|''Figure 1.1(c): Confirm to perform an action'']] | |[[File:C9.png|center|thumb|651x651px|''Figure 1.1(c): Confirm to perform an action'']] | ||
| | |[[File:C10.png|center|thumb|655x655px|Figure 1.1(d): Accessing the process]] | ||
|} | |} | ||
| Line 34: | Line 38: | ||
[[File:C11.png|center|thumb|524x524px|''Figure 1.1(e): Product request for standard request'']] | [[File:C11.png|center|thumb|524x524px|''Figure 1.1(e): Product request for standard request'']] | ||
=== | === 1.1.2 Standard Response - (Amsile) === | ||
[[File:C12.png|center|thumb|641x641px|''Figure 1.2(a): Accessing list of tasks with its status'']] | From the list of task on the left user should click "Task" then "Pool" to access task that are not yet worked on. From the list of tasks appeared click on the intended task with type "Request Standard" or click on the "eye" like symbol as shown on the figure below.[[File:C12.png|center|thumb|641x641px|''Figure 1.2(a): Accessing list of tasks with its status'']] | ||
Click on "Work on Response" to work on the task opened, also user can read the summary of request at the bar on the right as shown on the figure below. | |||
[[File:C13.png|center|thumb|565x565px|''Figure 1.2 (b):'']] | [[File:C13.png|center|thumb|565x565px|''Figure 1.2 (b):'']] | ||
Clicj on "+Response" to add the standard details as per request. | |||
{| | |||
|Click on "Response" to add the standard details as per request.[[File:C14.png|center|thumb|565x565px|''Figure 1.2 (c):''|border]] | |||
|Then Fill in the standard details as required and click "Save"[[File:C15.png|center|thumb|642x642px|''Figure 1.2 (d):'']] | |||
|} | |||
User can; | |||
1) Add standard response | |||
2)Remove standard response | |||
3)Save standard response. | |||
==== 3 | ==== 1.1.3 Specify Requirements - (Certification officer) ==== | ||
User will be able to view the standard response as shown the bar on the right side (see figure below) | |||
[[File:C16.png|center|thumb|640x640px|''Figure 1.3 (a):'']] | [[File:C16.png|center|thumb|640x640px|''Figure 1.3 (a):'']] | ||
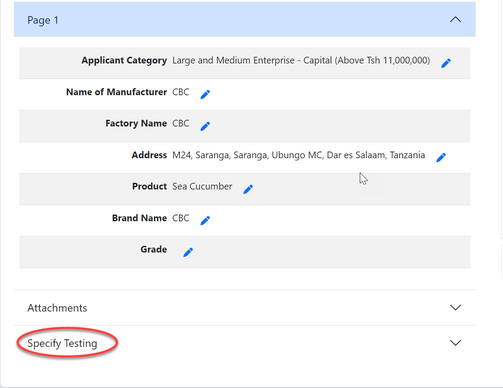
User will click the dropdown menu on the "Specify Testing" bar which is situated on the button of the page as shown on the figure below. | |||
[[File:C18.png|center|thumb|503x503px|''Figure 1.3 (b):'']] | [[File:C18.png|center|thumb|503x503px|''Figure 1.3 (b):'']] | ||
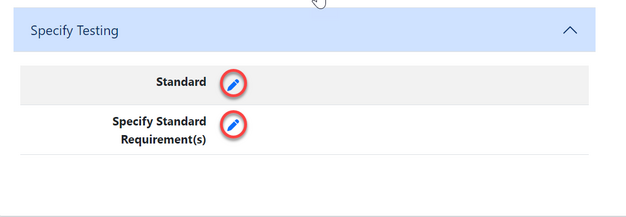
User will click on "pen" like symbol on the specify standard Requirement as shown on the figure below to edit the requirements. | |||
[[File:C20.png|center|thumb|626x626px|''Figure 1.3 (c):'']] | [[File:C20.png|center|thumb|626x626px|''Figure 1.3 (c):'']] | ||
==== 1.1.4 Review Application ==== | |||
{| | |||
|User will review application and approve or return for improvement.[[File:PRC1.png|center|thumb|647x647px|''Figure : Review application'']] | |||
|For approval, click confirm to confirm approving the application[[File:PRC2.png|center|thumb|656x656px|''Figure :Confirm approval'']] | |||
|} | |||
=== 1.2 Payment === | |||
=== 1.3 Inspection === | |||
Upon successfully done with the payment the process of inspection will commence, where assistance manager certification will initiate the process. | |||
==== 1.3.1 Inspection initiation and assignment (Assistance manager Certification) ==== | |||
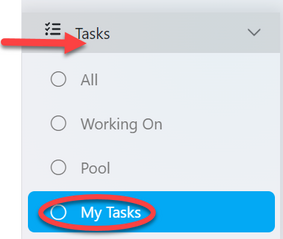
From the list of menu on the left click "Task" then click "My Task" as shown on the figure below. | |||
[[File:GDI20.png|left|thumb|283x283px|''Figure :Accessing tasks'']] | |||
From the list of task click on the intended one | |||
[[File:PRC6.png|center|thumb|663x663px|''Figure :List of tasks'' ]] | |||
{| | |||
|Click on "Assign" to assign inspection to inspector.[[File:CIN1.png|center|''Figure :Task assignment''|border|thumb|554x554px]] | |||
|On the popup window click on the dropdown menu to select the inspector[[File:CIN2.png|center|thumb|548x548px|''Figure : Task assignment'']] | |||
|} | |||
==== 1.3.2 Inspection (Inspector Certification) ==== | |||
From the list of menus on the left click "Task" then click "" to access the task assigned to inspector. | |||
[[File:GDI20.png|left|thumb|312x312px|''Figure :Accessing task list'']] | |||
From the list of tasks click on the intended one or click on "Eye" like symbol to open task. | |||
[[File:CIN3.png|center|thumb|602x602px|''Figure :List of tasks'']] | |||
User will initiate inspection process by clicking "Process" as shown on the figure below. | |||
[[File:CIN4.png|center|thumb|654x654px|''Figure :Inspection processes'']] | |||
User will be provided with the list of processes forms to be filled during inspection. See figure below | |||
[[File:CIN5.png|center|thumb|583x583px|''Figure :List of forms for inspection'']] | |||
'''1) Inventory''' | |||
User will click "Inventory" as shown on the figure above to access the inventory form. | |||
{| | |||
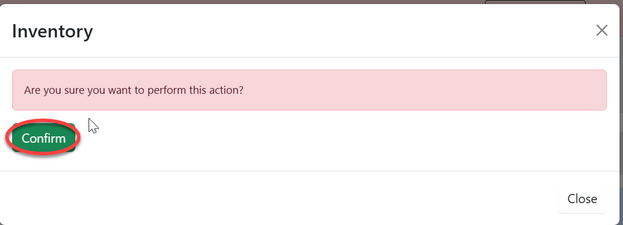
|Click on "Confirm" to agree opening inventory form.[[File:CIN6.png|border|center|thumb|623x623px|''Figure :Confirm opening inventory form'']] | |||
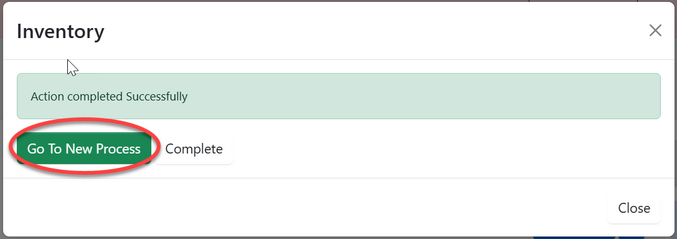
|Then Click "Go To New Process" to access the inventory form [[File:CIN7.png|center|thumb|677x677px|''Figure :Go to new process of filling inventory form'']] | |||
|} | |||
Fill in required details as shown on the form below, and click "Save". | |||
[[File:CIN8.png|center|thumb|521x521px|''Figure :Inventory form'']] | |||
{| | |||
|Click "Submit" to submit inventory form[[File:CIN9.png|center|thumb|690x690px|''Figure :Submit inventory form'']] | |||
|Click "Ok" to confirm inventory form submission as shown below.[[File:CIN01.png|center|thumb|669x669px|''Figure :Confirm submission of inventory form'']] | |||
|} | |||
Upon successfully submission of inventory form, the filled report will appear as shown below. | |||
[[File:CIN02.png|center|thumb|631x631px|''Figure :Inventory report.'']] | |||
'''2) Discrepancy form.''' | |||
Click on "Discrepancy" to start working on discrepancy form. | |||
[[File:CIN03.png|center|thumb|452x452px|Figure :]] | |||
Click on "Confirm" to agree opening a discrepancy form as shown below. | |||
{| | |||
|[[File:CIN04.png|center|frame|''Figure :'']] | |||
|Then Click "Go To New Process" to access the process of filling the discrepancy form.[[File:CIN05.png|center|frame|''Figure :Accessing the process of filling discrepancy form'']] | |||
|} | |||
Fill in the required details as shown below and click "Save" to save them. | |||
{| | |||
|Click on "Checklist" to add details of discrepacy[[File:CIN06.png|border|center|thumb|566x566px|''Figure :Adding discrepancy issues'']] | |||
|Fill in the required details as shown below and click "Save" to save them.[[File:CIN07.png|center|frame|''Figure :'']] | |||
|} | |||
User can; | |||
i. Add details of discrepancy | |||
ii. Remove details of discrepancy | |||
iii. Then click "Save" added details of discrepancy as shown on the figure below. | |||
[[File:CIN08.png|center|thumb|630x630px|''Figure :'' ]] | |||
Click on "Submit" to submit form or click on "Edit Form" to edit details, save and submit. | |||
Click "Ok" to confirm submission of discrepancy form. | |||
'''3)Point Arising''' | |||
Click "Point-Arising" to access point arising form. | |||
[[File:CIN00.png|center|thumb|433x433px|''Figure :'']] | |||
. | |||
{| | |||
|Click "Confirm" to confirm accessing the process of filling point arising form[[File:CIN12.png|center|thumb|601x601px|''Figure :'']] | |||
|Click on "Go To New Process" to access the process of filling point arising form.[[File:CIN13.png|center|thumb|633x633px|Figure :]] | |||
|} | |||
Fill in the details as required | |||
[[File:CIN14.png|center|frame|''Figure :'']] | |||
Fill in the required details | |||
[[File:CIN15.png|center|thumb|616x616px|Figure :]] | |||
User can 1)Add (2) Remove (3) Then "Save" save details of point arised as shown on the figure below. | |||
[[File:CIN16.png|center|thumb|655x655px|''Figure :'']] | |||
{| class="wikitable" | |||
|+ | |||
|Click "Submit" to submit point arising form or click "Edit Form" to edit details, save and submit[[File:CIN17.png|center|frame|''Figure :'']] | |||
|Click "Ok" to confirm the submission of point arising form.[[File:CIN18.png|center|thumb|515x515px|''Figure :'']] | |||
|} | |||
Upon successfully submitting point arising form, the form with the details will appear as shown on the figure below. | |||
[[File:CIN19.png|center|frame|''Figure :'']] | |||
'''4) Sample Registration''' | |||
Click "Sample - Register" as shown below | |||
[[File:CIN20.png|center|thumb|481x481px|''Figure :'']] | |||
{| class="mw-collapsible" | |||
|Click "Confirm" to confirm accessing process of sample registration[[File:CIN22.png|center|thumb|576x576px|''Figure :'' ]] | |||
|Click "Go To New Process" to open the process of sample registration[[File:CIN23.png|center|thumb|554x554px|''Figure :'']] | |||
|} | |||
Fill in the required details on the sample register form then click "Save" to save them. See figure below. | |||
[[File:CIN24.png|center|thumb|539x539px|''Figure :Sample reigister form'']] | |||
Click "Submit" to submit or "Edit Form" edit details, save and submit. | |||
[[File:CIN25.png|left|thumb|488x488px|''Figure :Sample register submission'']] | |||
Click "Ok" to confirm submission of sample register. | |||
[[File:CIN26.png|center|thumb|456x456px|''Figure :Confirm submitting sample register form'']] | |||
Upon successfully submission the sample register form will appear as shown on the figure below. | |||
[[File:CIN27.png|center|thumb|626x626px|''Figure :'']] | |||
After filling all the required form during inspection | |||
[[File:CIN28.png|center|thumb|501x501px|''Figure :Inspection'']] | |||
1) Associated Documents - Contains all the forms filled during inspection which make an inspection report, Click the "Dropdown menu" pointed by the arrow to access them. | |||
2) The view of all forms after opening associated document tab, here user can view each form. | |||
3)Click "Proceed" to comment proceed with the process. User will see the popup window where comment will be filled and click "" to submit as shown on the figure below. | |||
[[File:CIN29.png|center|thumb|455x455px|''Figure :Remarks for inspection report'']] | |||
==== 1.3.3 Inspection Review (Assistance Manager Certification) ==== | |||
After successfully completing the inspection and submitting all the required forms. The Assistant Manager will review the reports and, if any improvements are needed, will return them; otherwise, they will approve them for further proceedings. | |||
From the list of "My " AMCert will click the intended task or click "eye" like symbol to open it. | |||
[[File:CIN30.png|center|thumb|673x673px|''Figure :'']] | |||
Click "" to start working on aproval | |||
[[File:CIN31.png|left|thumb|508x508px|''Figure :Working on inspection review'']] | |||
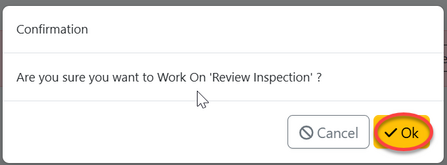
Click "Ok" to confirm working on inspection review | |||
[[File:CIN32.png|center|thumb|447x447px|''Figure :Confirm working on review'']] | |||
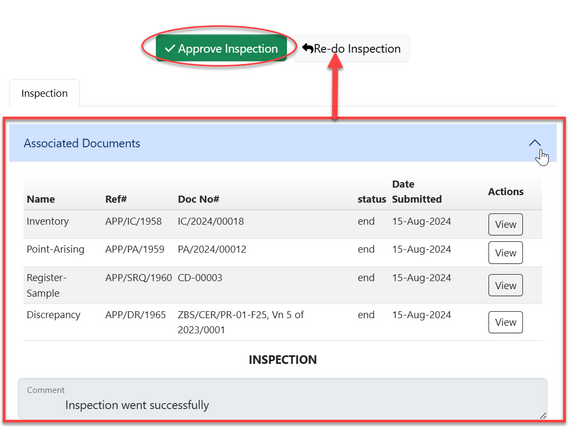
For improvements click "Return" as pointed by the arrow, otherwise click "Approve" to approve the report. | |||
[[File:CIN34.png|center|thumb|582x582px|''Figure :Reviewing inspection report'']] | |||
=== 1.4 Testing === | |||
For sample registered during inspection will be required to be sent to lab for testing. Assistant manager will initiate testing by clicking on "Work on test" then confirm by clicking "Ok". See figure and figure below. | |||
[[File:CT1.png|border|left|thumb|507x507px|''Figure :Working on testing'']] | |||
Click "Process" to access the process of requesting for testing. | |||
[[File:CT2.png|border|center|frame|''Figure :'']] | |||
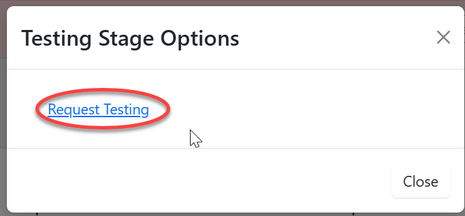
Click "Request Testing" to open the process of testing. | |||
[[File:CT3.png|left|thumb|465x465px|''Figure :Request testing'']] | |||
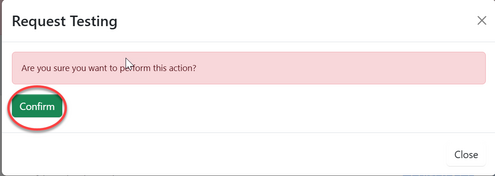
Click "Confirm" to confirm initiating the process of testing. | |||
[[File:CT4.png|center|thumb|495x495px|''Figure : Confirm initiating testing request'']] | |||
Click "Go To New Process" to go to the testing process | |||
[[File:CT5.png|center|frame|''Figure :Go to new process of testing'']] | |||
Fill in the required details required in a test request form regarding the sample collected from inspection, then click save to save. | |||
[[File:CT6.png|center|thumb|611x611px|''Figure :Test request form'']] | |||
{| class="wikitable" | |||
|+ | |||
|Click "Submit Test Request" to submit it or click "Edit Form" to edit details, save and submit[[File:CT7.png|border|center|thumb|578x578px|''Figure : Submitting test request'']] | |||
|Confirm submitting the test request[[File:CT8.png|center|thumb|458x458px|''Figure :Confirm submission'']] | |||
|} | |||
[[Testing|'''Testing division will proceed with the testing process and return the testing report. Click here to access the guide for testing.''']] | |||
== 2. Routine Inspection == | |||
== 3. Maintenance Processes == | |||
=== 3.1 Renewal === | |||
=== 3.2 Withdraw === | |||
=== 3.3 Suspend === | |||
=== 3.4 Retention === | |||
=== 3.5 Reduction === | |||
=== 3.6 Extension === | |||
Latest revision as of 15:05, 15 August 2024
Certification
Product Certification
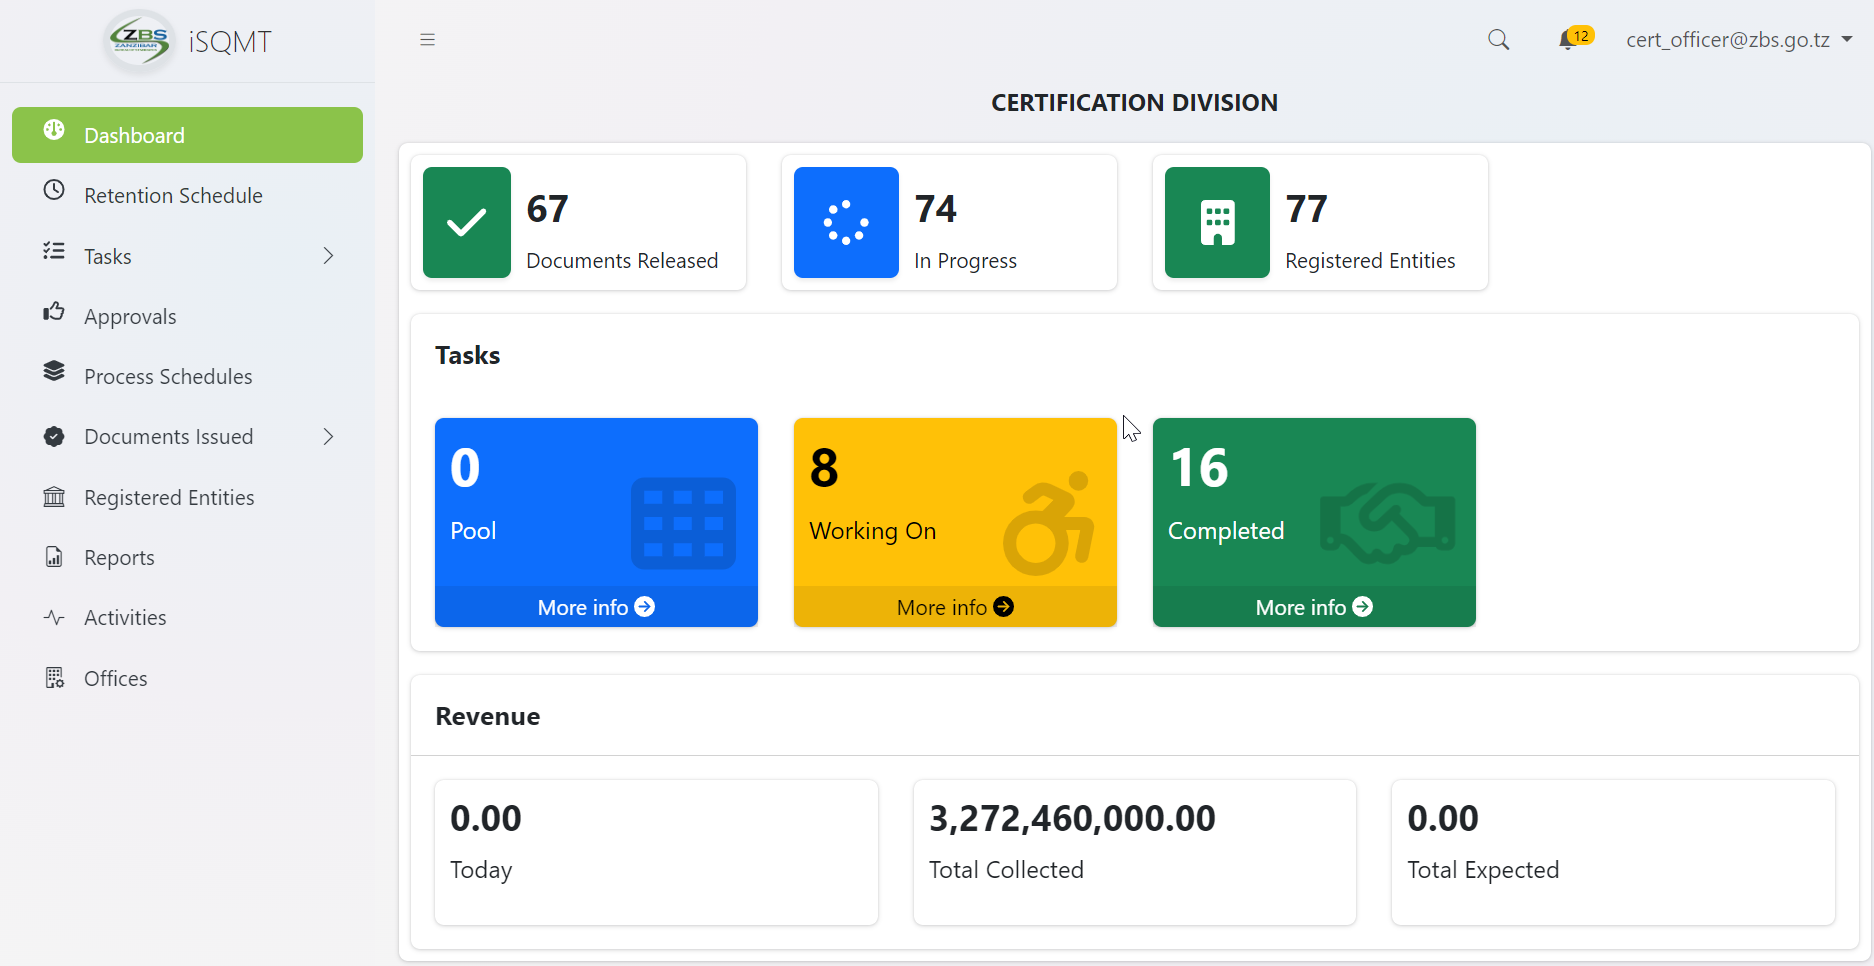
When certification officer logged in successful will be landed on this home page - dashboard (see figure below)
1.1 Reviewing Application - (Certification Officer)
On reviewing application certification officer supposed to check for the standard and testing capabilities before approving the application.
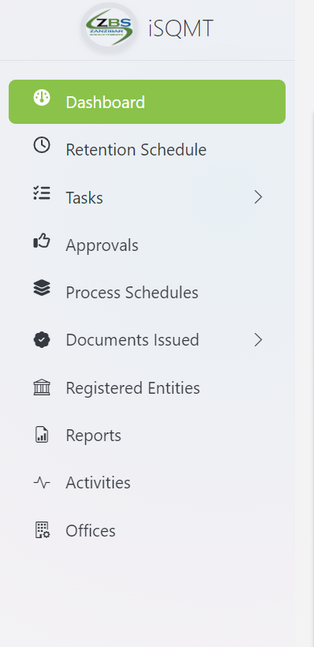
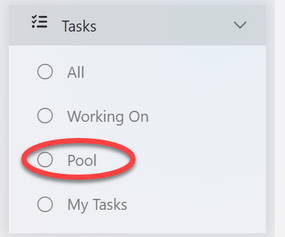
a) From the menu at left click on task to access different task's categories.
b) From the task's categories select pool to access new tasks
c) Select the intended application to work on by clicking on the application or eye symbol as shown on the figure below.
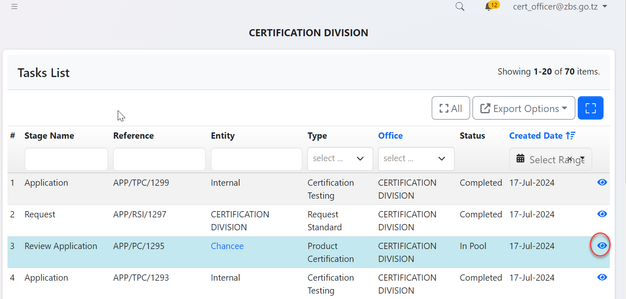
Click on "Work On Review Application" to get access to work on the application
image*
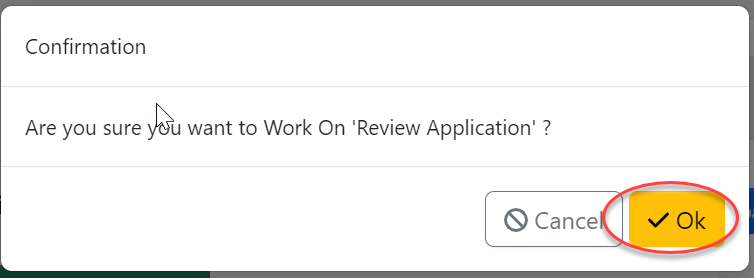
Click "Ok" to confirm working on Review Application.
1.1.1 Standard Requesting
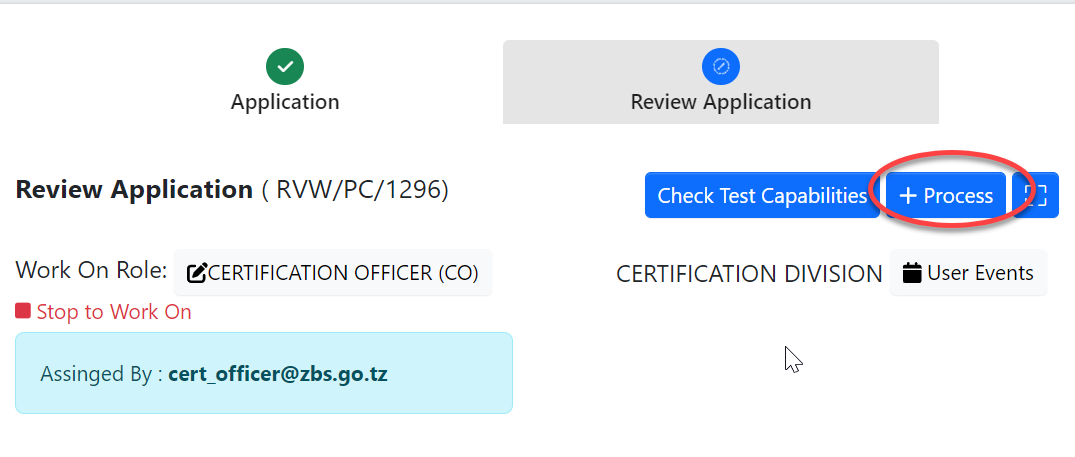
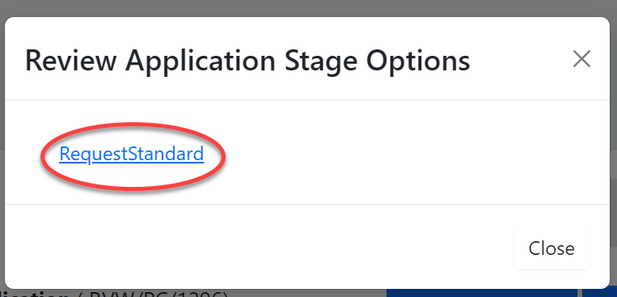
To start a new process click on "Process" to access Review application stage options
Click on Request standard to send a request of standard to the standard division.
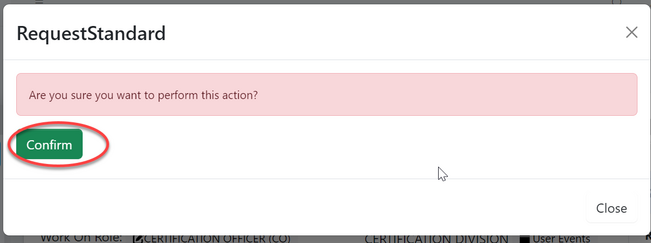
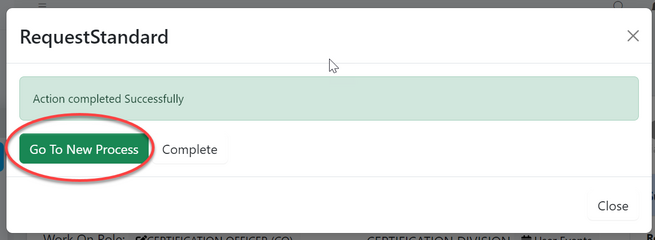
Click on "Confirm" to agree working on requesting standard. Then click "Go To New Process" to proceed ( See figure c9 and c10)
 |
 |
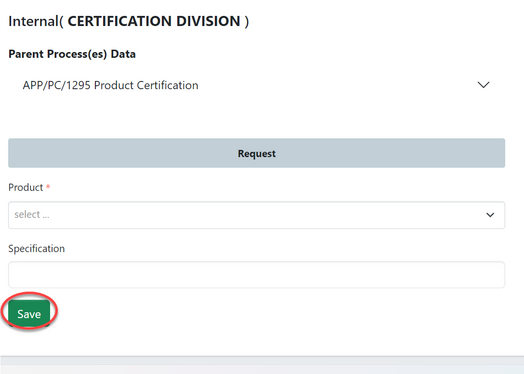
To request for a standard fill in the details required for product and click "SAVE" as shown in the figure below.
1.1.2 Standard Response - (Amsile)
From the list of task on the left user should click "Task" then "Pool" to access task that are not yet worked on. From the list of tasks appeared click on the intended task with type "Request Standard" or click on the "eye" like symbol as shown on the figure below.

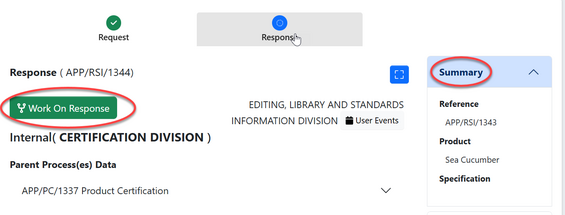
Click on "Work on Response" to work on the task opened, also user can read the summary of request at the bar on the right as shown on the figure below.
Clicj on "+Response" to add the standard details as per request.
Click on "Response" to add the standard details as per request.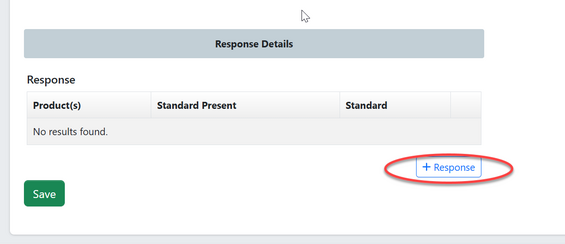 |
Then Fill in the standard details as required and click "Save"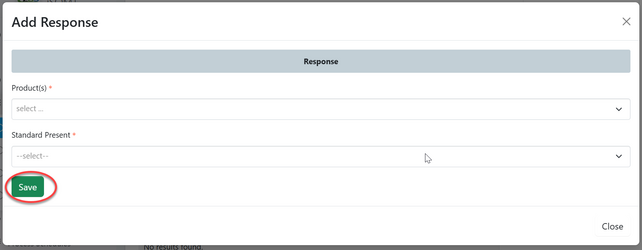 |
User can;
1) Add standard response
2)Remove standard response
3)Save standard response.
1.1.3 Specify Requirements - (Certification officer)
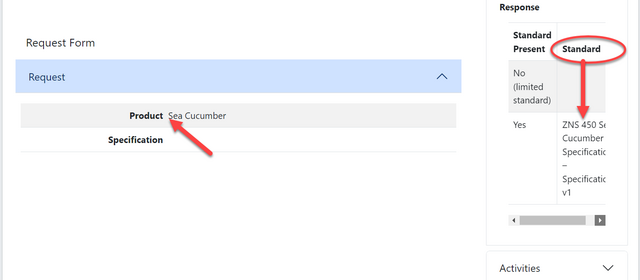
User will be able to view the standard response as shown the bar on the right side (see figure below)
User will click the dropdown menu on the "Specify Testing" bar which is situated on the button of the page as shown on the figure below.
User will click on "pen" like symbol on the specify standard Requirement as shown on the figure below to edit the requirements.
1.1.4 Review Application
User will review application and approve or return for improvement. |
For approval, click confirm to confirm approving the application |
1.2 Payment
1.3 Inspection
Upon successfully done with the payment the process of inspection will commence, where assistance manager certification will initiate the process.
1.3.1 Inspection initiation and assignment (Assistance manager Certification)
From the list of menu on the left click "Task" then click "My Task" as shown on the figure below.
From the list of task click on the intended one

Click on "Assign" to assign inspection to inspector. |
On the popup window click on the dropdown menu to select the inspector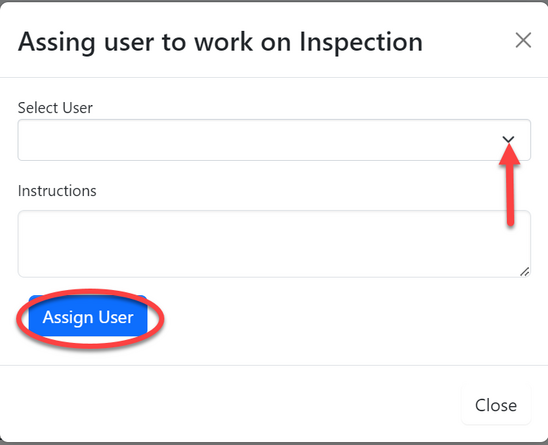 |
1.3.2 Inspection (Inspector Certification)
From the list of menus on the left click "Task" then click "" to access the task assigned to inspector.
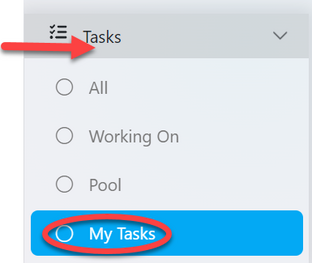
From the list of tasks click on the intended one or click on "Eye" like symbol to open task.

User will initiate inspection process by clicking "Process" as shown on the figure below.

User will be provided with the list of processes forms to be filled during inspection. See figure below
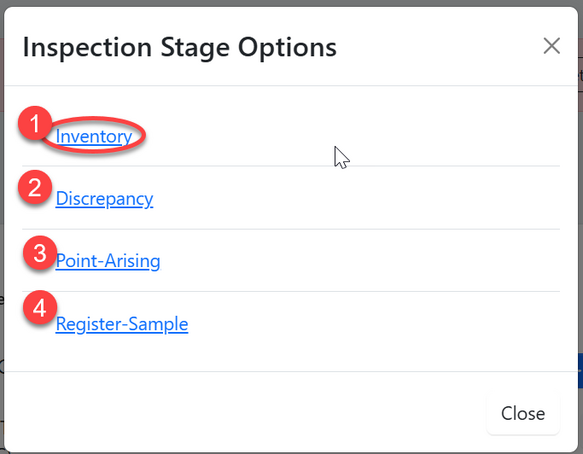
1) Inventory
User will click "Inventory" as shown on the figure above to access the inventory form.
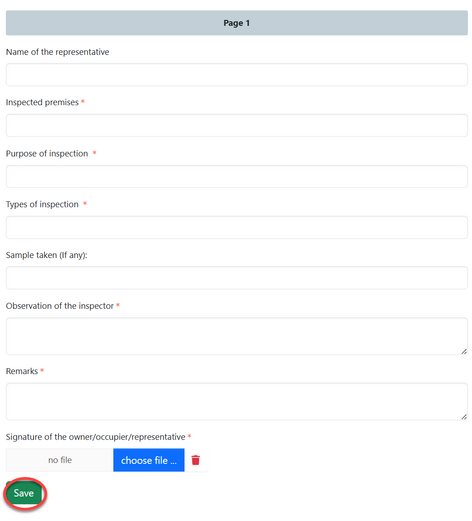
Fill in required details as shown on the form below, and click "Save".
Click "Submit" to submit inventory form |
Click "Ok" to confirm inventory form submission as shown below.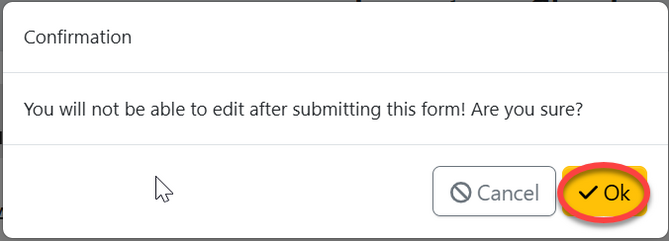 |
Upon successfully submission of inventory form, the filled report will appear as shown below.
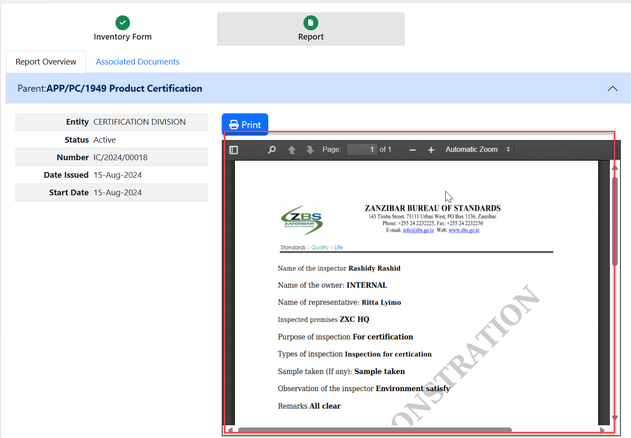
2) Discrepancy form.
Click on "Discrepancy" to start working on discrepancy form.
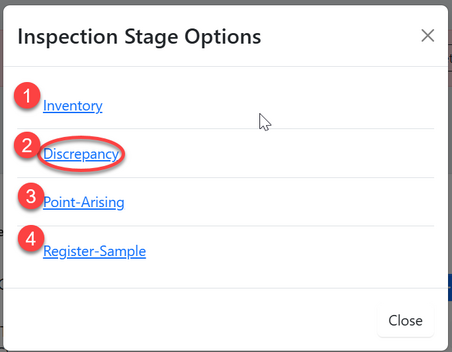
Click on "Confirm" to agree opening a discrepancy form as shown below.
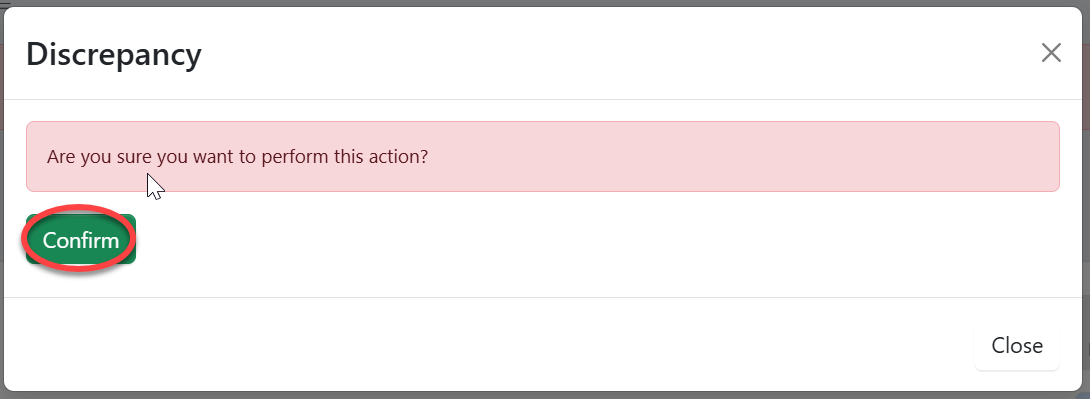 |
Then Click "Go To New Process" to access the process of filling the discrepancy form.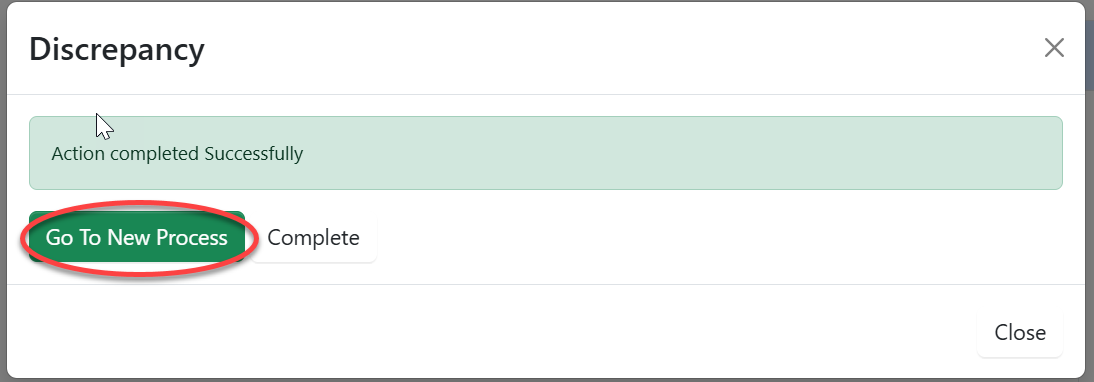 |
Fill in the required details as shown below and click "Save" to save them.
Click on "Checklist" to add details of discrepacy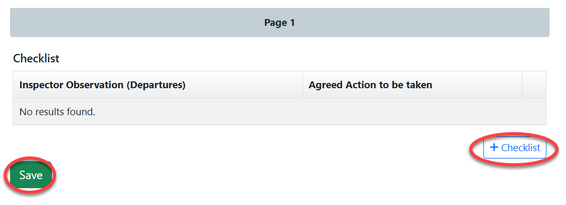 |
Fill in the required details as shown below and click "Save" to save them.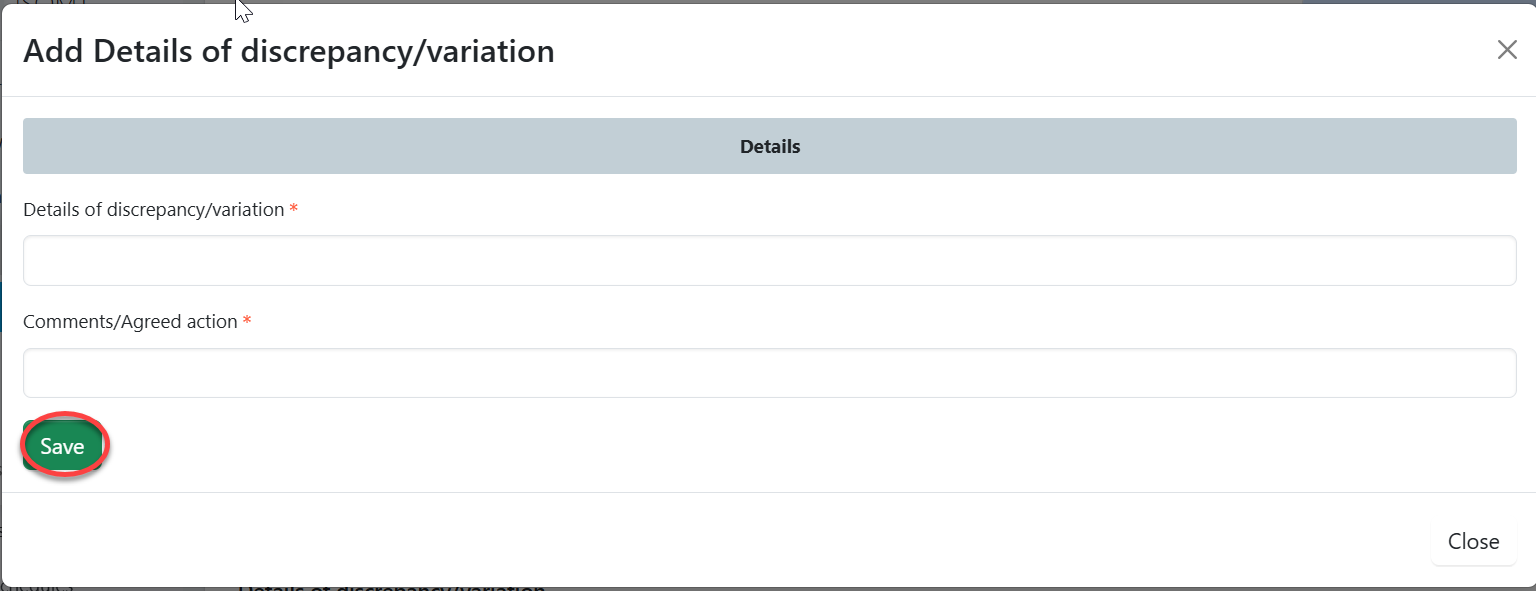 |
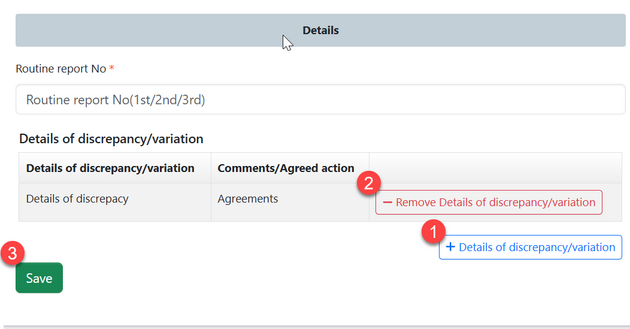
User can;
i. Add details of discrepancy
ii. Remove details of discrepancy
iii. Then click "Save" added details of discrepancy as shown on the figure below.
Click on "Submit" to submit form or click on "Edit Form" to edit details, save and submit.
Click "Ok" to confirm submission of discrepancy form.
3)Point Arising
Click "Point-Arising" to access point arising form.
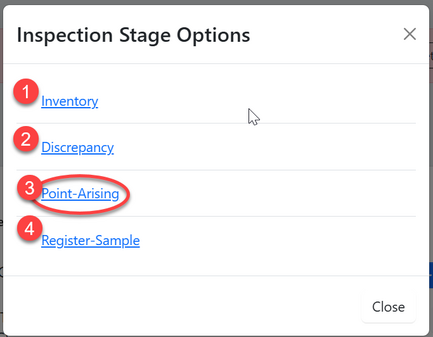
.
Click "Confirm" to confirm accessing the process of filling point arising form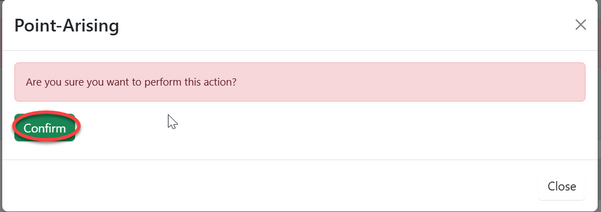 |
Click on "Go To New Process" to access the process of filling point arising form.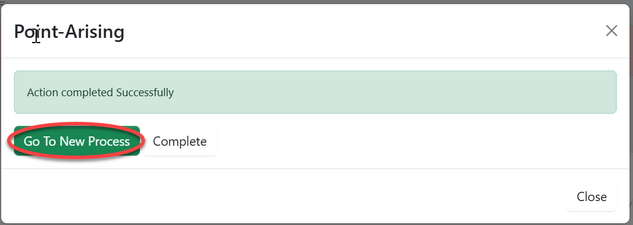 |
Fill in the details as required
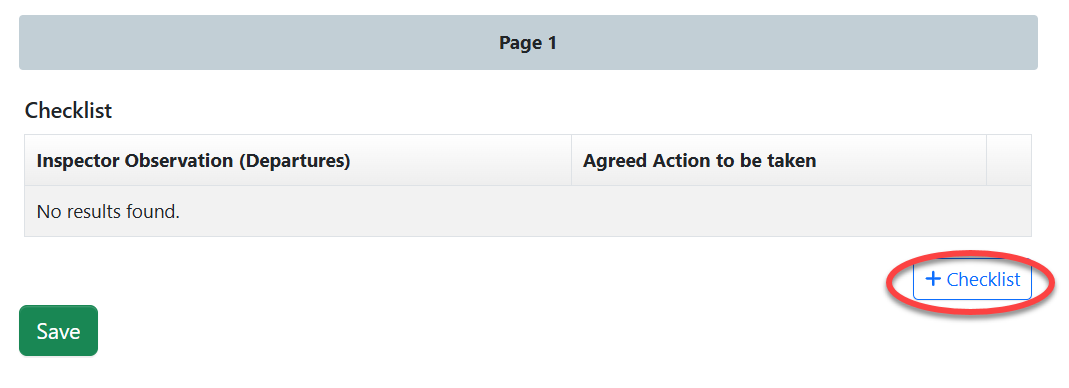
Fill in the required details
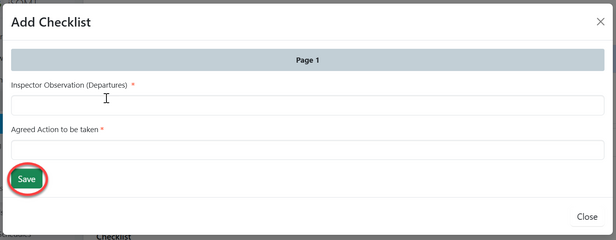
User can 1)Add (2) Remove (3) Then "Save" save details of point arised as shown on the figure below.
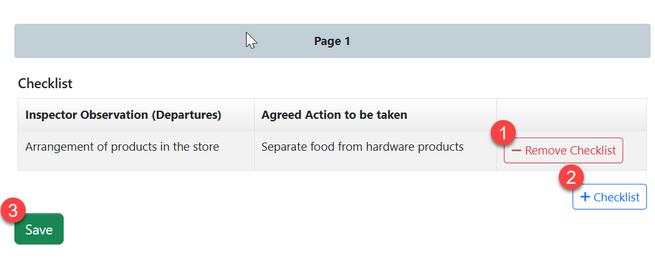
Click "Submit" to submit point arising form or click "Edit Form" to edit details, save and submit |
Click "Ok" to confirm the submission of point arising form.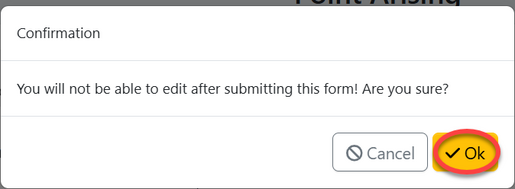 |
Upon successfully submitting point arising form, the form with the details will appear as shown on the figure below.
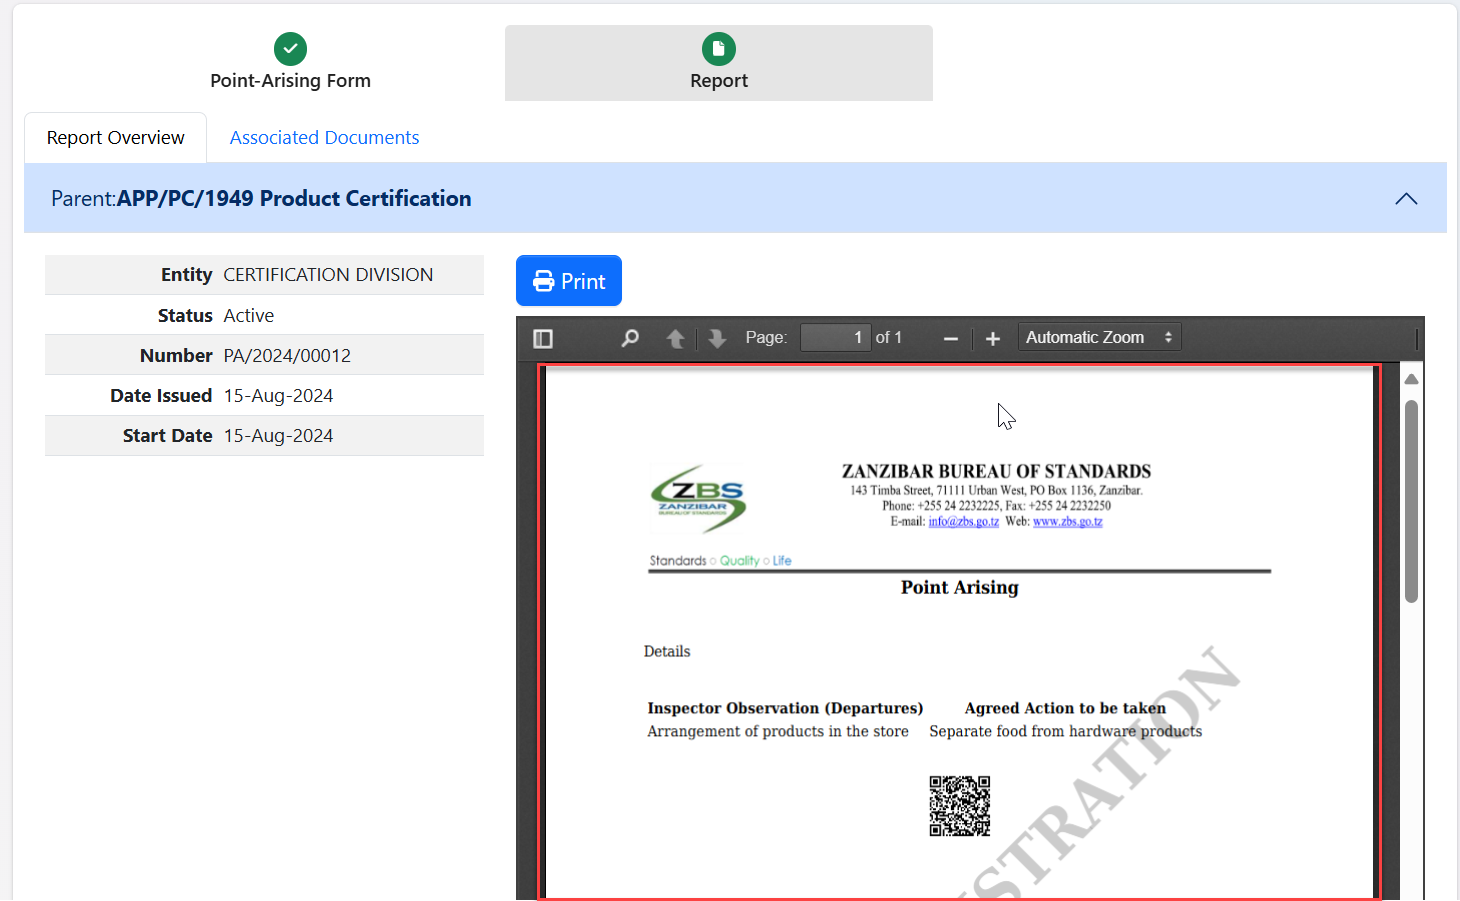
4) Sample Registration
Click "Sample - Register" as shown below
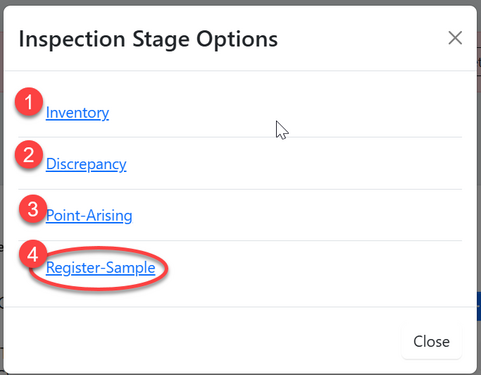
Click "Confirm" to confirm accessing process of sample registration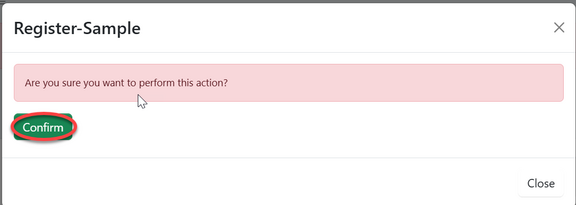 |
Click "Go To New Process" to open the process of sample registration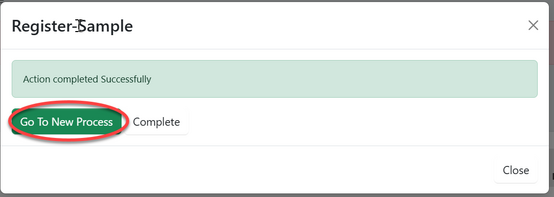 |
Fill in the required details on the sample register form then click "Save" to save them. See figure below.
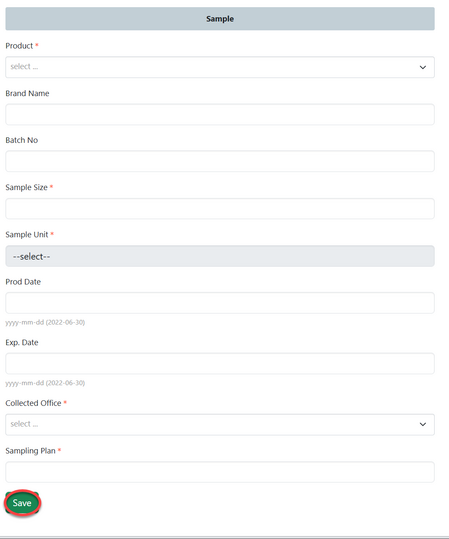
Click "Submit" to submit or "Edit Form" edit details, save and submit.

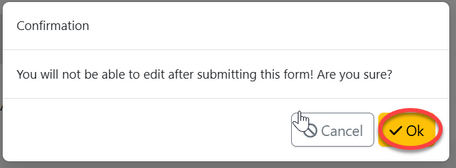
Click "Ok" to confirm submission of sample register.
Upon successfully submission the sample register form will appear as shown on the figure below.
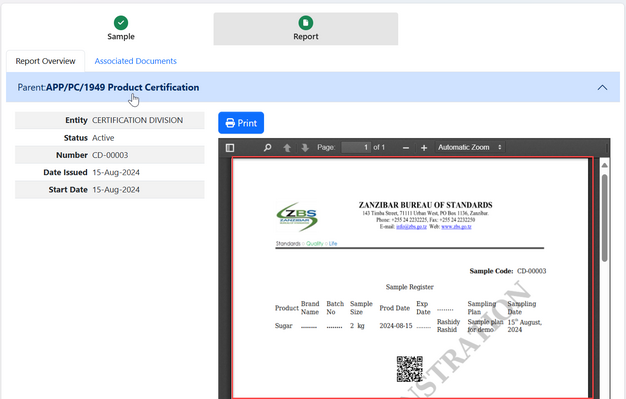
After filling all the required form during inspection
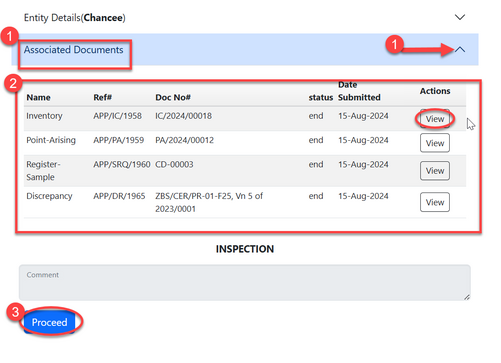
1) Associated Documents - Contains all the forms filled during inspection which make an inspection report, Click the "Dropdown menu" pointed by the arrow to access them.
2) The view of all forms after opening associated document tab, here user can view each form.
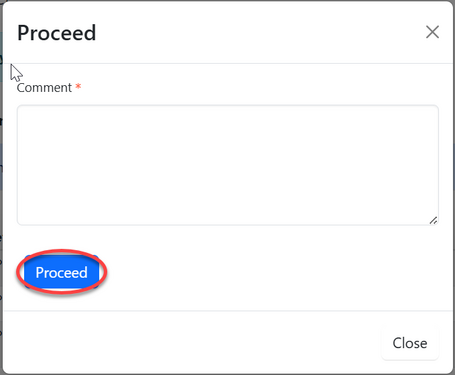
3)Click "Proceed" to comment proceed with the process. User will see the popup window where comment will be filled and click "" to submit as shown on the figure below.
1.3.3 Inspection Review (Assistance Manager Certification)
After successfully completing the inspection and submitting all the required forms. The Assistant Manager will review the reports and, if any improvements are needed, will return them; otherwise, they will approve them for further proceedings.
From the list of "My " AMCert will click the intended task or click "eye" like symbol to open it.

Click "" to start working on aproval
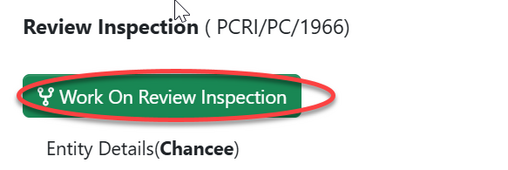
Click "Ok" to confirm working on inspection review
For improvements click "Return" as pointed by the arrow, otherwise click "Approve" to approve the report.
1.4 Testing
For sample registered during inspection will be required to be sent to lab for testing. Assistant manager will initiate testing by clicking on "Work on test" then confirm by clicking "Ok". See figure and figure below.

Click "Process" to access the process of requesting for testing.

Click "Request Testing" to open the process of testing.
Click "Confirm" to confirm initiating the process of testing.
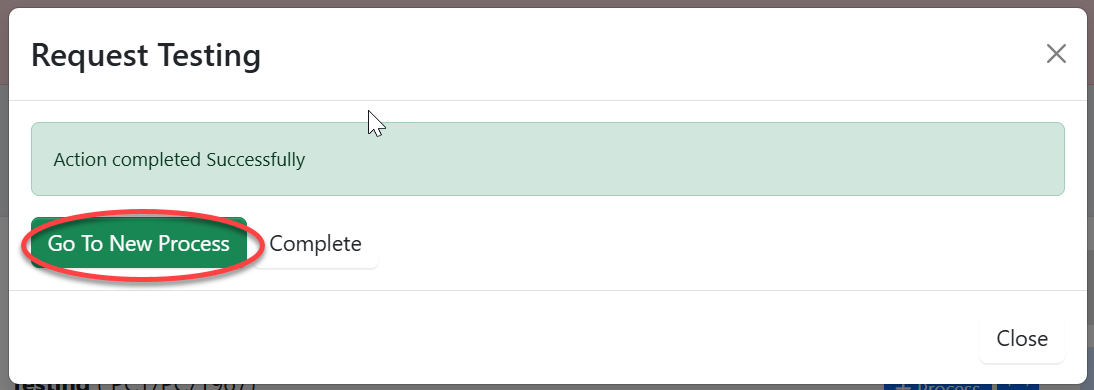
Click "Go To New Process" to go to the testing process
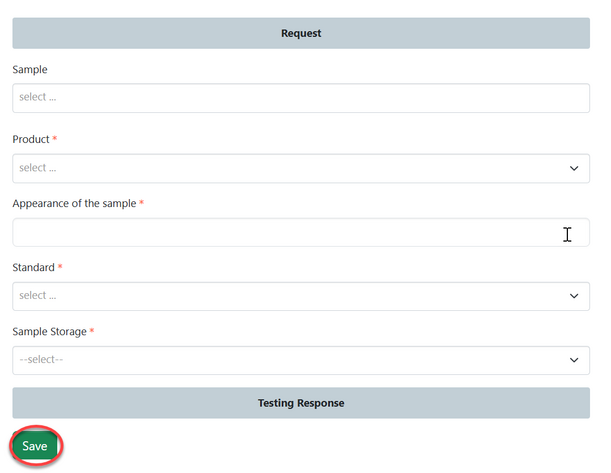
Fill in the required details required in a test request form regarding the sample collected from inspection, then click save to save.
Click "Submit Test Request" to submit it or click "Edit Form" to edit details, save and submit |
Confirm submitting the test request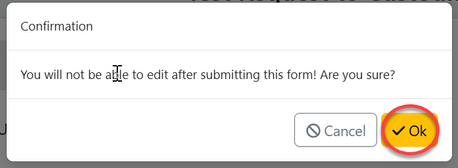 |
