System Management: Difference between revisions
Chanceness (talk | contribs) No edit summary |
Chanceness (talk | contribs) |
||
| Line 207: | Line 207: | ||
=== 3.1 Forms === | === 3.1 Forms === | ||
This is where users' inputs are stored to be processed according to business requirements, including application forms and other internal documents. | This is where users' inputs are stored to be processed according to business requirements, including application forms and other internal documents. | ||
'''''accessing forms;''''' | |||
1) From the list of menus click on "System Process" to access different processes. | 1) From the list of menus click on "System Process" to access different processes. | ||
| Line 234: | Line 236: | ||
# Scope - Field to appear on frontend / backend user 2) Label. 3) Field number (as they appear). 4)Select input type (data type). 5)Check "Required" if the field is mandatory. 6)Check "Is Active" to activate the field. Then click "Create" to save as shown on the figure ''3.1(h)'' below. | # Scope - Field to appear on frontend / backend user 2) Label. 3) Field number (as they appear). 4)Select input type (data type). 5)Check "Required" if the field is mandatory. 6)Check "Is Active" to activate the field. Then click "Create" to save as shown on the figure ''3.1(h)'' below. | ||
[[File:F8.png|center|thumb|465x465px|''Figure 3.1(h):Creating new field'']] | [[File:F8.png|center|thumb|465x465px|''Figure 3.1(h):Creating new field'']] | ||
==== 3.1.3 Activating Forms ==== | ==== 3.1.3 Activating Forms ==== | ||
From the list of forms, the created form will appear with the red x (see figure ''3.1(i)'' below) To activate click on the form or "eye" like symbol to open the form. | From the list of forms, the created form will appear with the red x (see figure ''3.1(i)'' below) To activate click on the form or "eye" like symbol to open the form. | ||
| Line 243: | Line 244: | ||
Click "Ok" to confirm. | Click "Ok" to confirm. | ||
[[File:F11.png|center|thumb|660x660px|''Figure 3.1(k): Confirm creating form storage'']] | [[File:F11.png|center|thumb|660x660px|''Figure 3.1(k): Confirm creating form storage'']] | ||
==== 3.2 Field Type ==== | |||
Refers to the specific kind of input field used in a form to capture user data. Different types of form fields have been designed to collect various types of information, (as from applications). | |||
[[Field Types|Click here for a more detailed explanation of field types]] | |||
== 4. Component Management == | == 4. Component Management == | ||
Revision as of 18:09, 28 July 2024
Introduction
This guide provides blueprints for creating, updating, and supporting the use of the system to ensure its optimal performance and functionality. To manage and configure the system, users must have an administrator role and the necessary permissions. Admin accounts is created by the super-admin account, which is provided by the developers.
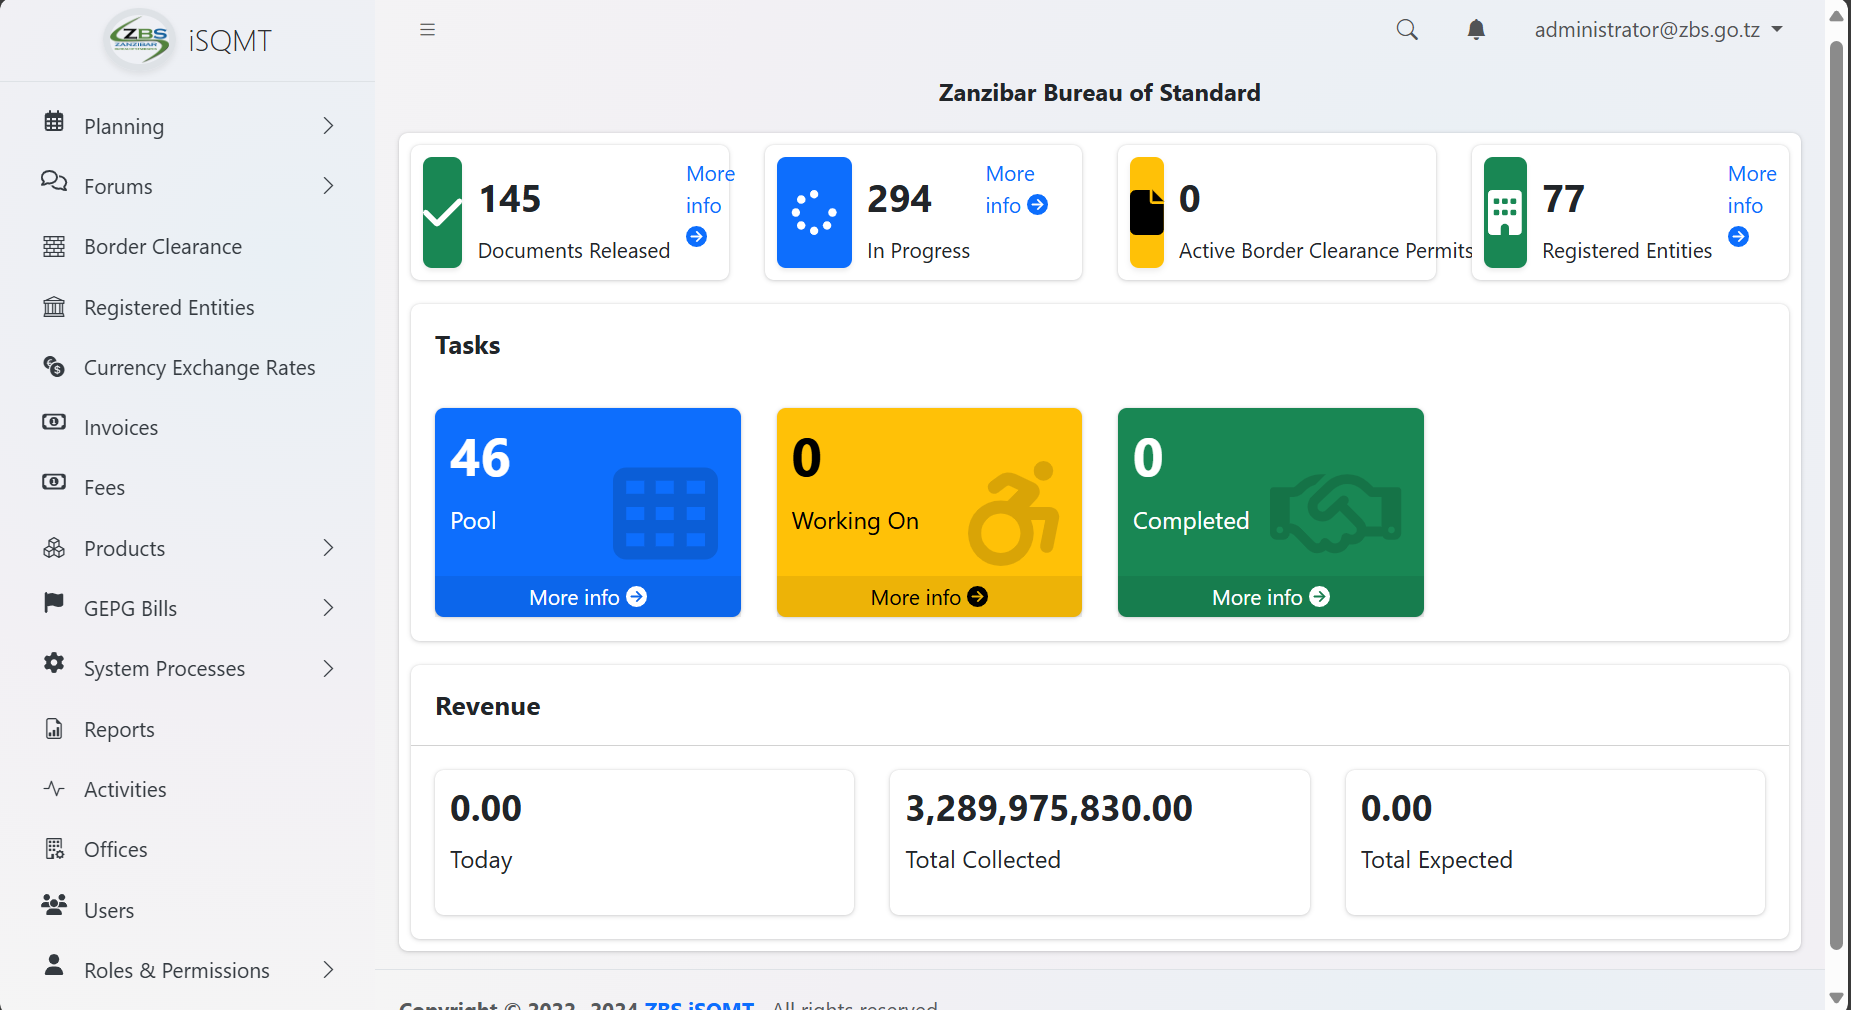
Upon logging in, users will be directed to this page with various menus and buttons. This guide will explain only the key menus that are essential for administrators to manage the system effectively.
1. Office Management
In this section, users can manage offices, people, roles, and permissions. Administrators will have the ability to create, update, and freeze user and office accounts.
1.1 Office
1.1.1 Accessing Offices
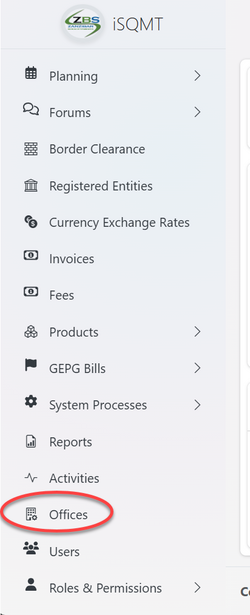
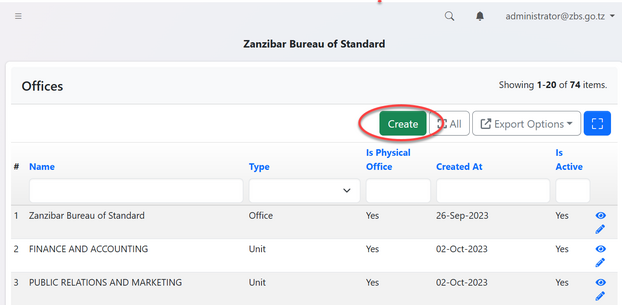
From the list of menu on the left click "Office" as shown on the figure 1. 1(a) below. On the list of offices click "Create" to create a new office.(See figure 1.1(b))
 |
 |
1.1.2 Creating Office
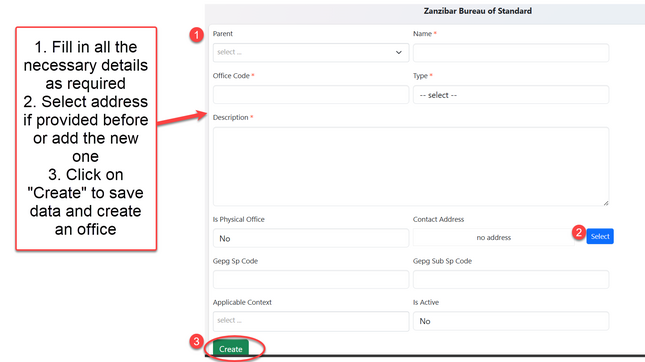
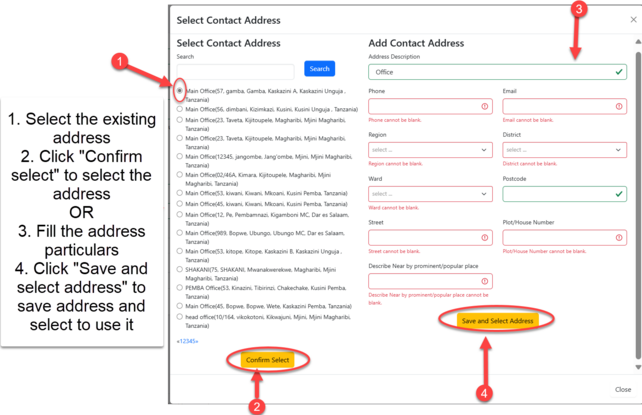
You will be provided with the form to fill. Fill the details as required as shown on figure 1.1(c). On the filed of address you can select the existing address and click "Confirm Select" or add the address by filling all the particulars and click "Save and Select Address" to save as shown on figure 1.1(d).
1.1.3 Editing Office
After saving the details user will be landed on the page shown on the figure 1.1(e), where can access buttons for "update details", "adding servicing area" and "Upload Branding Items"
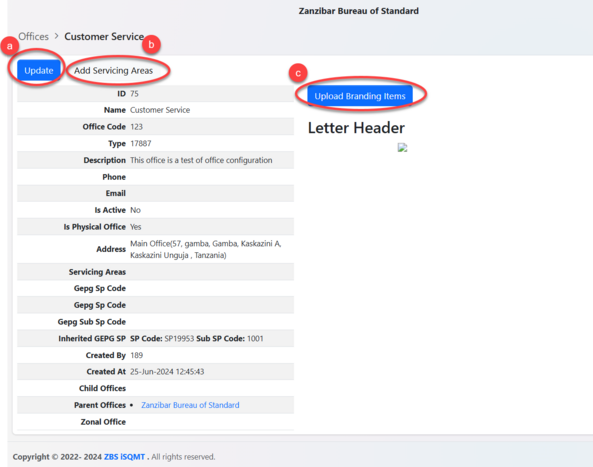
a) User can update details of office by editing and save. Also can deactivate office by selecting "NO" on the field 'is active'.
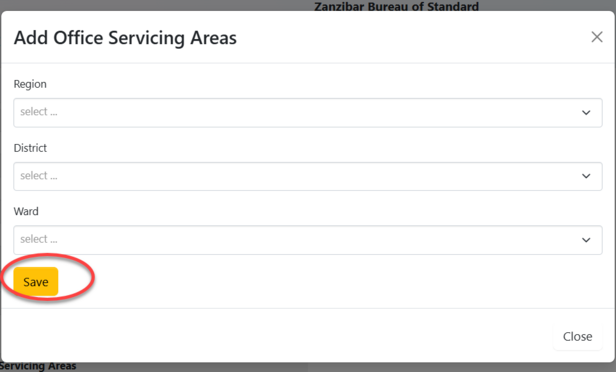
b) User can add other areas that office is suppose to service apart from the main office. Here user can put details of the area as required and save.
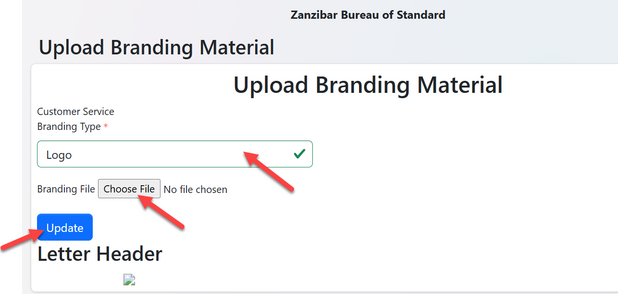
c) User can upload branding materials
1.2 Roles and Permission Registration
1.2.1 Accessing Roles and Permission
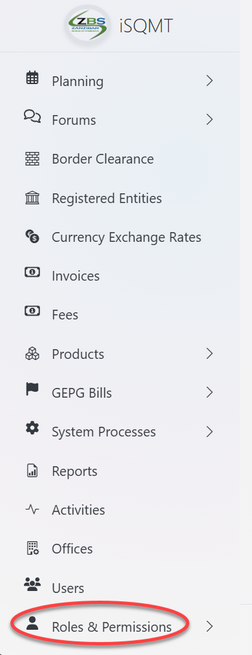
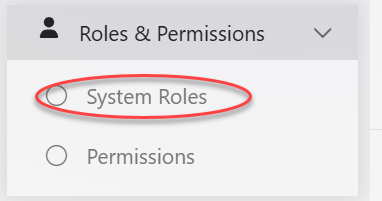
From the list of the menu click "Roles and Permission" as shown on figure 1.2(a). Then click on "System Roles" to access roles as shown on the figure 1.2(b) below.
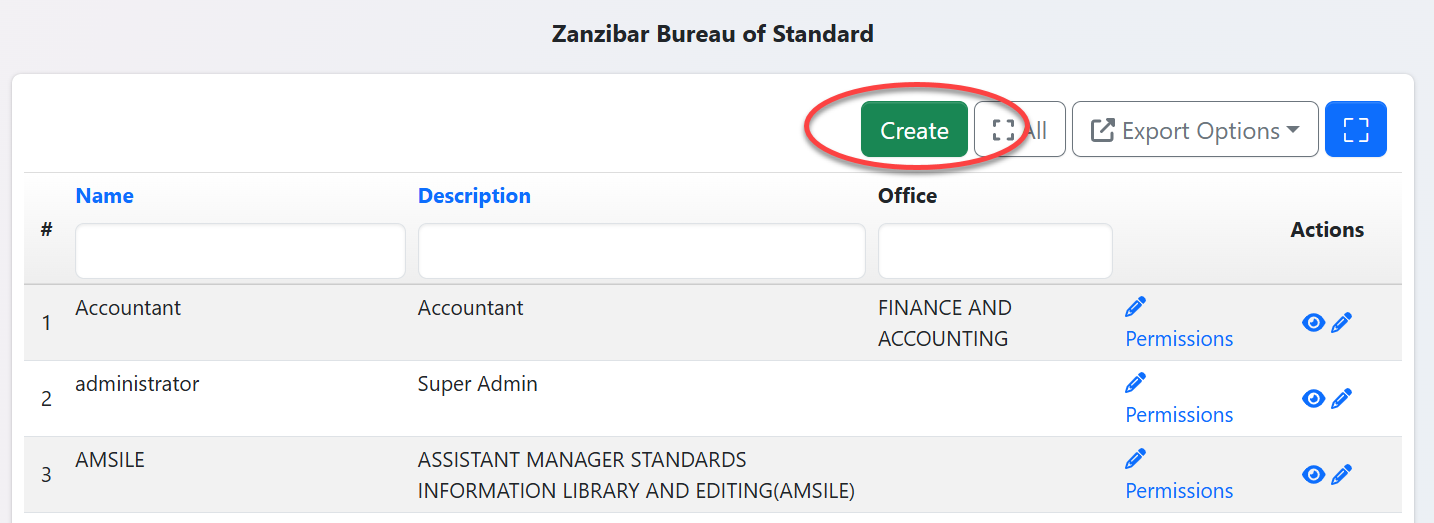
User will be landed on the list of existing roles (if any) and have an option to create a new role by clicking "Create" as shown on the figure 1.2(c) below.
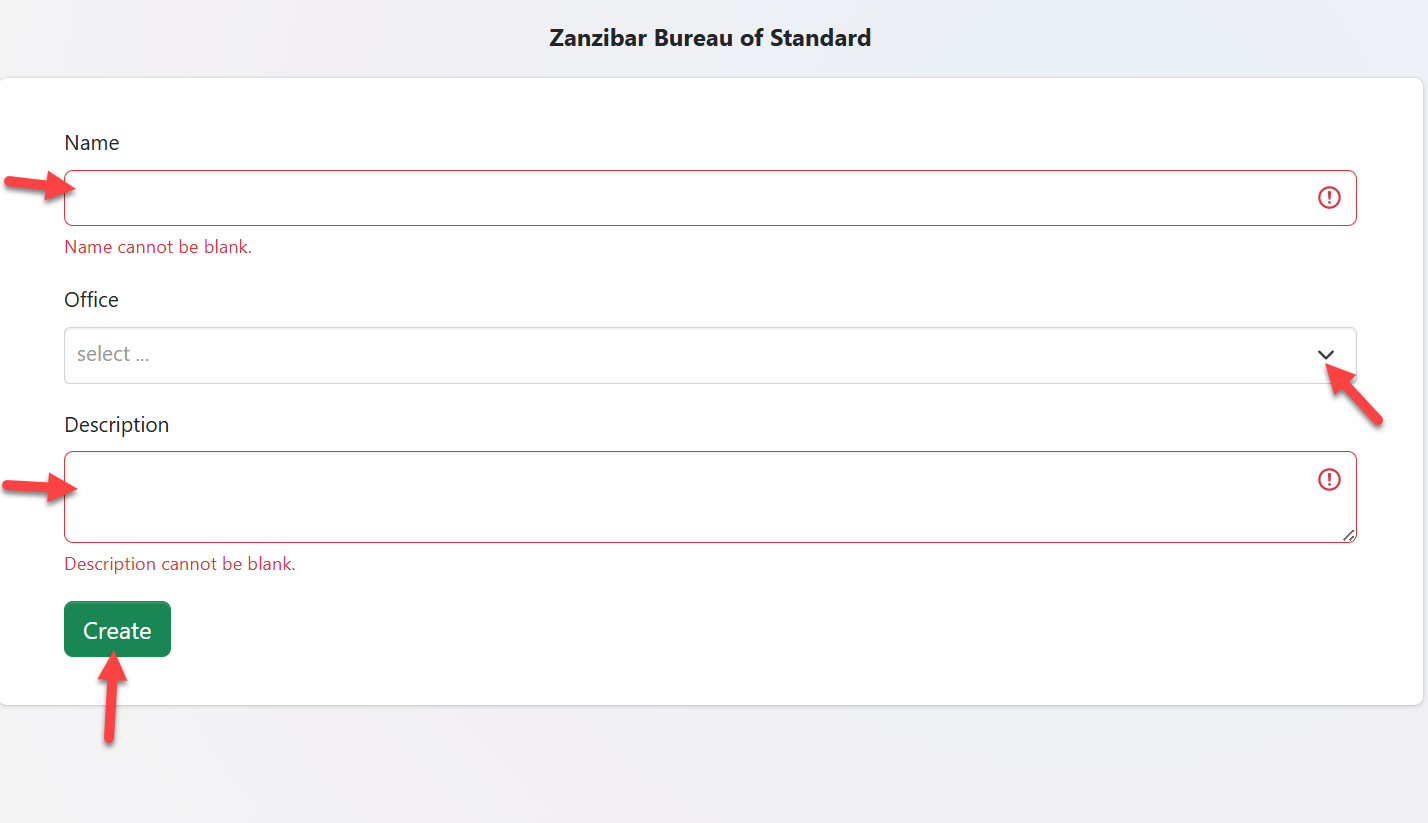
User will required to fill the name of the role, its description, and associate a role by selecting the pre-created office from the dropdown menu. Then click "Create" to save the details.( see figure1.2(d)
1.2.2 Permissions
Permissions are granted to users to allow them access to various system functionalities. The permissions are tied on the user roles, not user accounts.
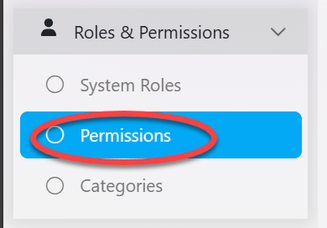
From the menu 'System roles and permission' click "permission" to access the list of system permissions.
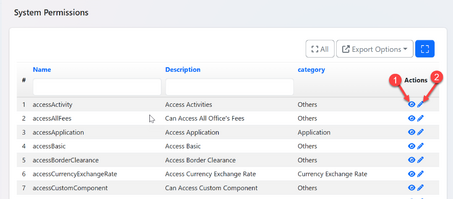
From the list of permissions user can; 1) view and 2)Update permissions see figure 1.2(f).
Assigning permission to a role
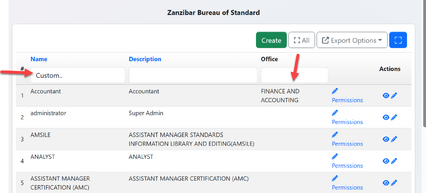
From the menu Roles & Permission, click on "System Roles". From the list of roles search the intended role as shown on the figure 1.2(g). On the intended role click on the "Permission" as shown on the figure 1.2 (h) below.

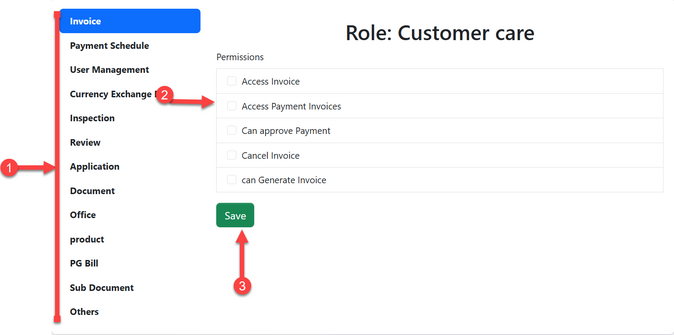
User will be landed to the page where there is a list of permissions to be assigned to the role (see figure 1.2(i) below).
1) Click the intended permission from the list
2) Tick all the boxes of permissions that apply
3)Click the button Save . The permission will be successful assigned to the role.
1.3 User Management
1.3.1 Creating User
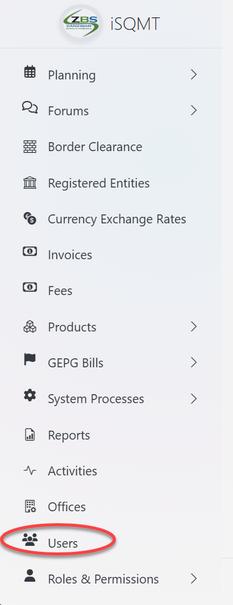
To create a new user, click "Users" from the list of menus on the left.(See figure 1.3(a))
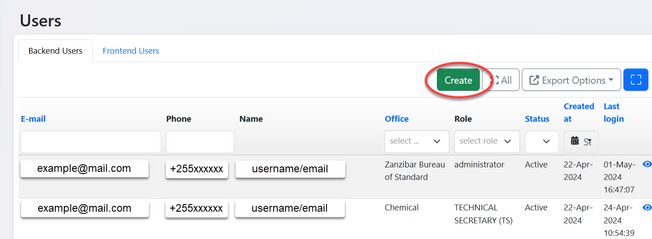
From the list of users, click "Create" button situated on the top-right of the list as shown on the figure 1.3(b) below.
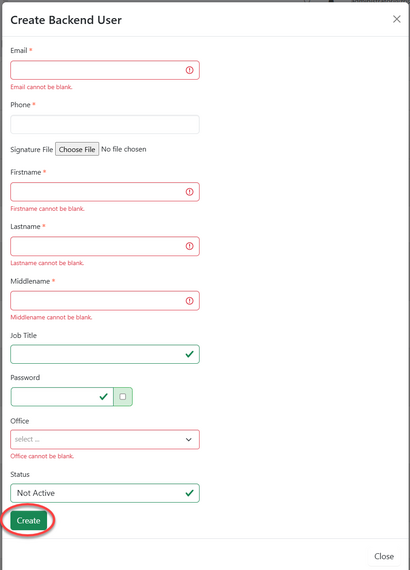
Fill in the required details as shown on the figure 1.3 (c) below and click "Create" to save.
1.3.2 Update User
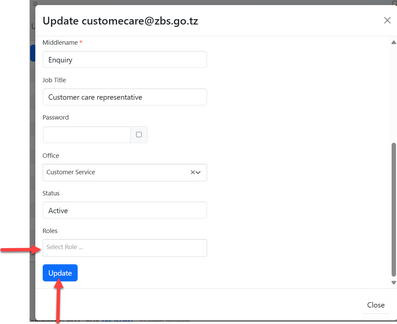
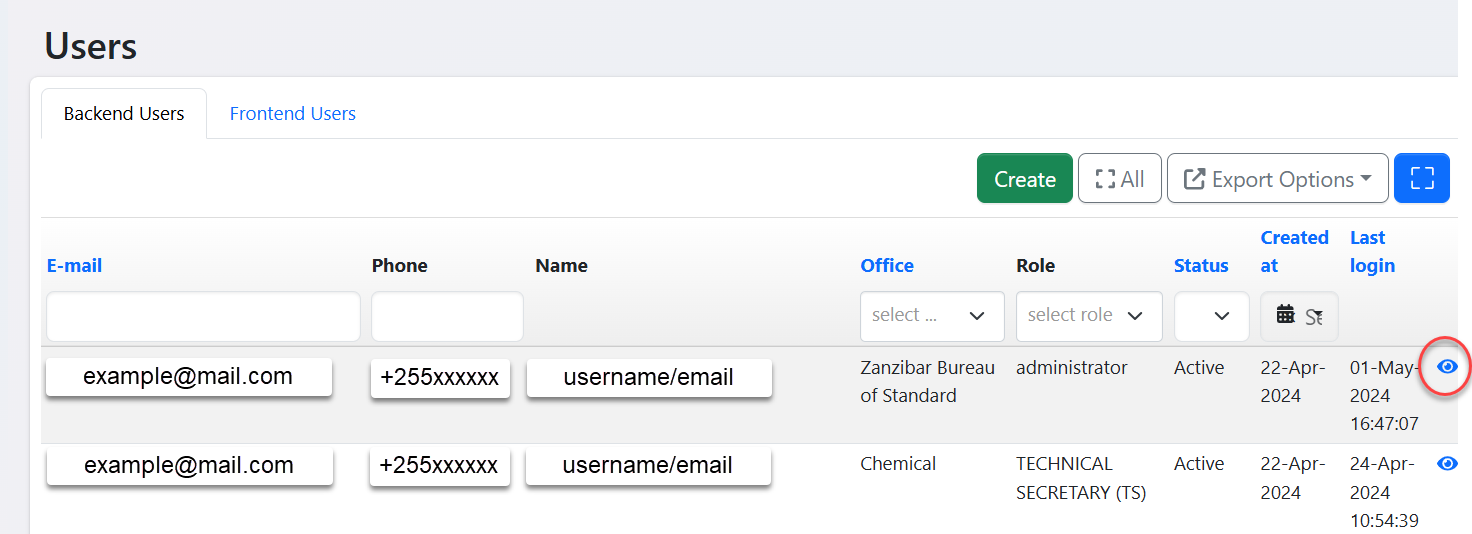
User's details can be updated by clicking the intended user or "eye" like symbol from the list of users. see figure 1.3(e) below. Here users' details like role, names, phones &etc. can be edited as well as deactivated.
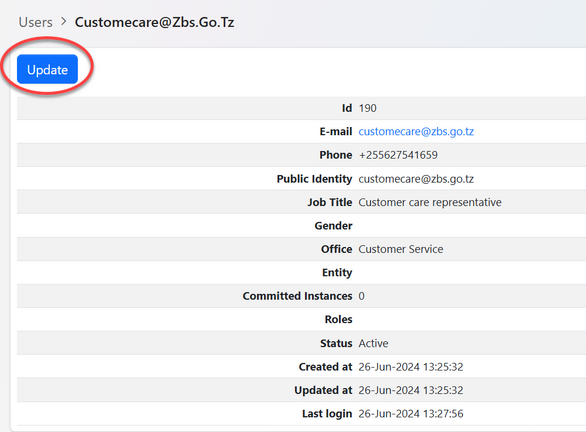
Click on the button "Update" to edit user's details.
2. Product Management
This is the management of a central repository for all product information used in processes such as standardization, certification, inspection, and testing, including functionalities for creating, deactivating, updating, and associating products with one another.
2.1 Product
From the list of menus, user should click on the product to access all the list of product options.
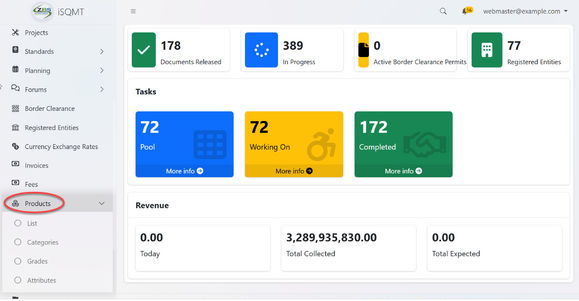
2.1.1 Creating Product
From the menus of product click on "List" to access the list of products and its options.
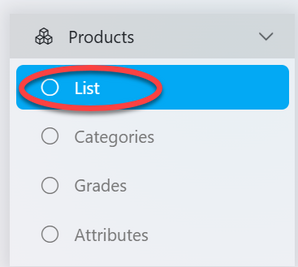
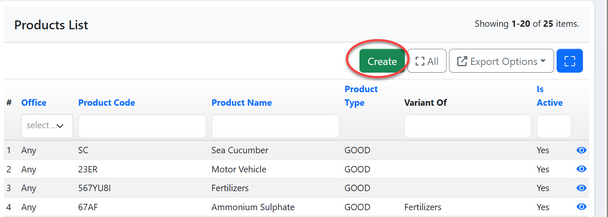
From the list of product click "Create" to create a new product.
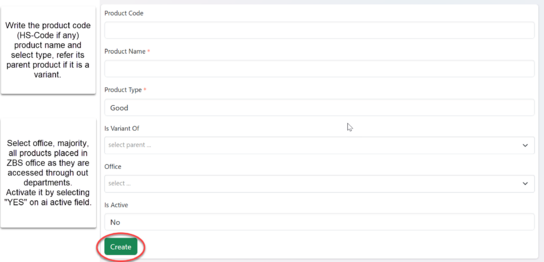
Fill in the required details and click "Save"
2.1.2 Updating & Deleting Product
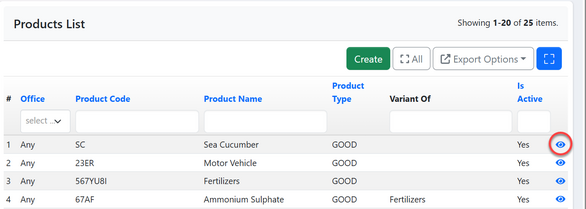
From the list of product click a product you want to update or click on the "eye" like symbol as shown in the figure 2.1 (d) below.
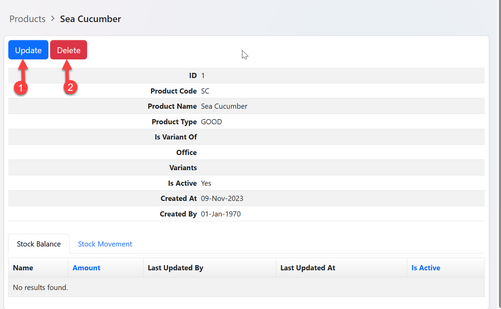
1)Updating Product - User will click "Update " to edit product details.
2) Deleting Product - User will click on "Delete" to delete product (Currently the functionality to delete product has been disabled for administrational purposes) (see figure 2.1(e) below)
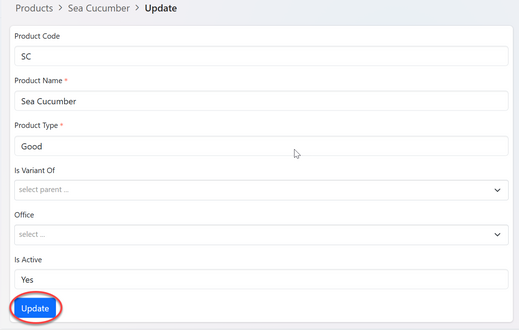
Upon successful clicking Update user will be directed to the window with product details to be altered, edit as intended and click "Save" ( See figure 2.1(f) below).
2.2 Product Category
2.2.1 Creating Category
From the list of product menu, click on "Category" to access product category
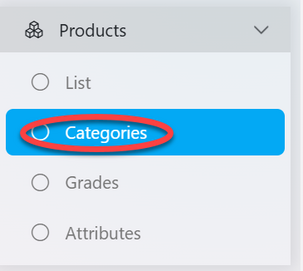
From the list of product category click on the button "Create" to create new category (see figure 2.2(b) below)

Fill in all the required details and click "Save"

2.2.2 Updating and Deleting Category
From the list of product categories click on the category intended or click on the "eye" like symbol to open it (See figure 2.2(d) below)

User will be landed on the page with options regarding category (See Figure 2.2(e) below)
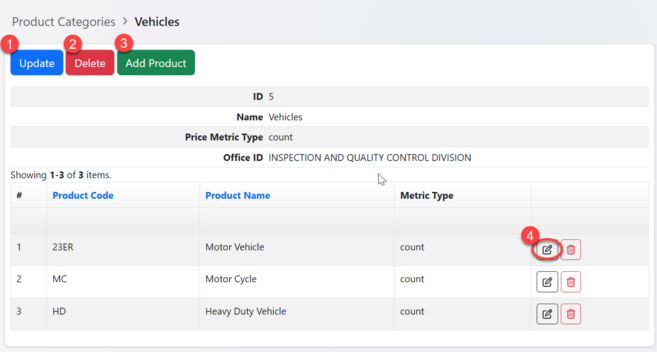
1) Update Category - Click on the button "Update" as shown on the figure 2.2(f) above.
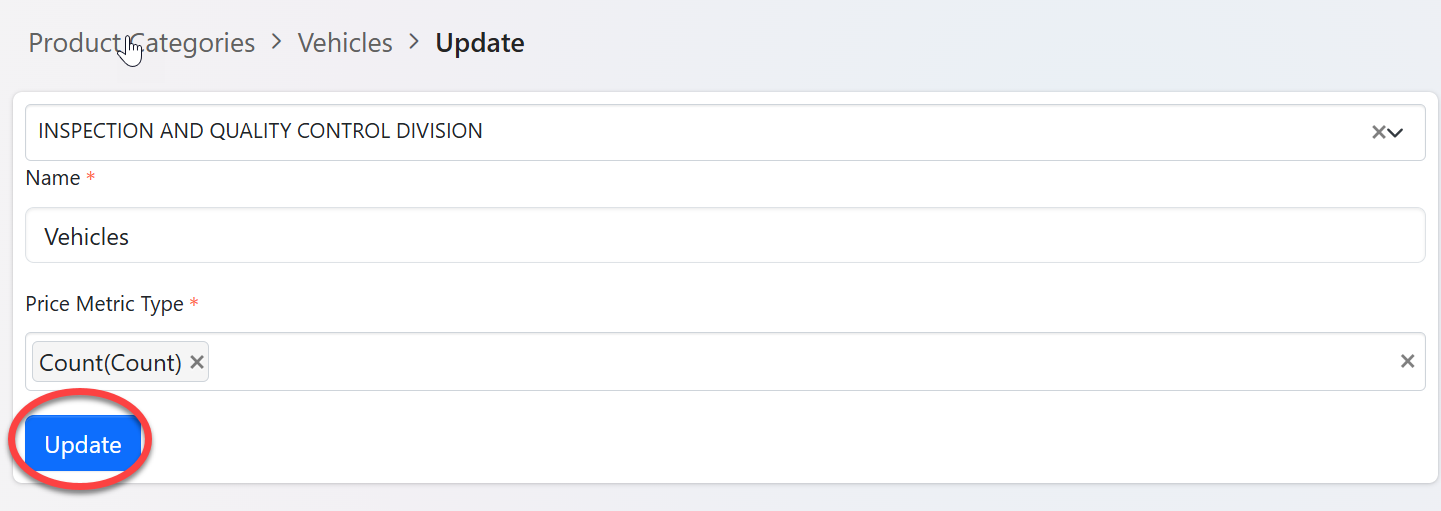
2)Deleting Category - Click on the button "Delete" as shown on the figure 2.2(e) above.
3) Add product - Click on the button "Add Product" as shown on the figure 2.2(e) above.
Fill in the required details;
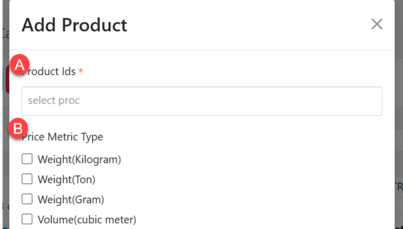
A) Select a product to add from the list
B) Tick the box of the metric for a selected product then save.
4) Add Metric Type - Click on editing symbol as shown on the figure 2.2(e) ~4 above.
Then tick the box of the metric as shown on the figure 2.2(g) ~B above.
2.3 Product Attribute
2.3.1 Creating attribute
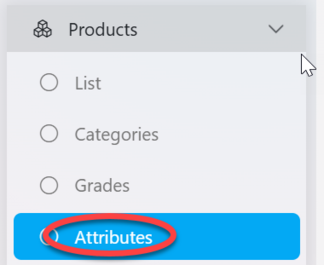
From the list of attributes click on "Create" to create new attributes
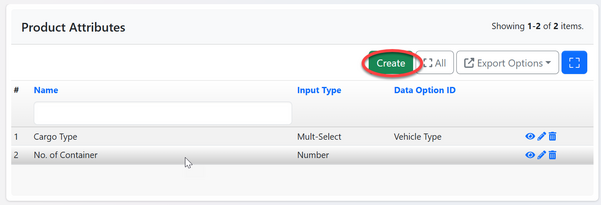
Fill in the required details for product attribute and click save.
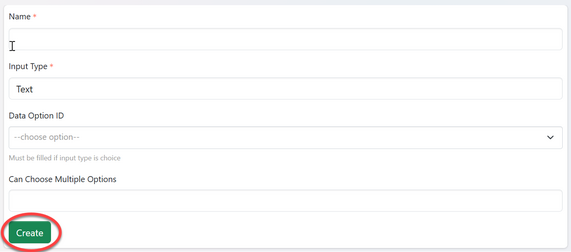
2.3.2 Updating & deleting attribute
From the list of attributes you can find the options to:
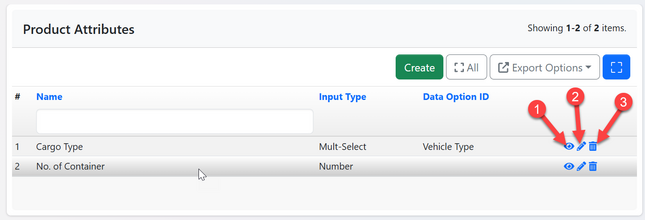
1) View - Click on the "eye" like symbol to view attribute details
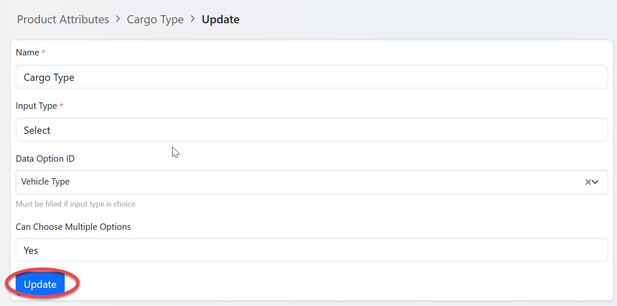
2)Update - Click on the "pen" like symbol to update the attribute details.
Edit the required details and click "Update" to save as shown in the figure 2.3(e)below.
3)Delete - Click on the "bin" like symbol to delete the attribute.
3. Process Management
3.1 Forms
This is where users' inputs are stored to be processed according to business requirements, including application forms and other internal documents.
accessing forms;
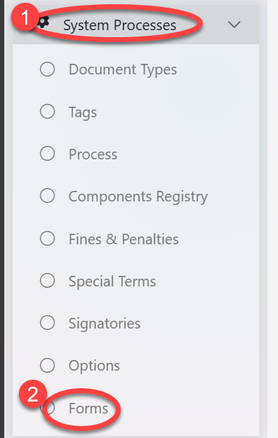
1) From the list of menus click on "System Process" to access different processes.
2) From the list of processes click "Form" as shown on the figure below.
3.1.1 Creating Forms
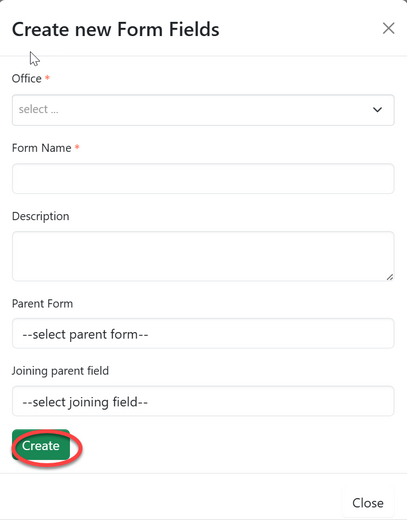
Upon successful clicking on the menu "Form" user will be landed on the page with the list of forms and a button to create new. Click on "Create" to create new form (See figure Figure 3.1(b)below)

Fill in the required details as selecting office, name, parent form if any and click "Create" then close.
3.1.2 Creating Page and Field
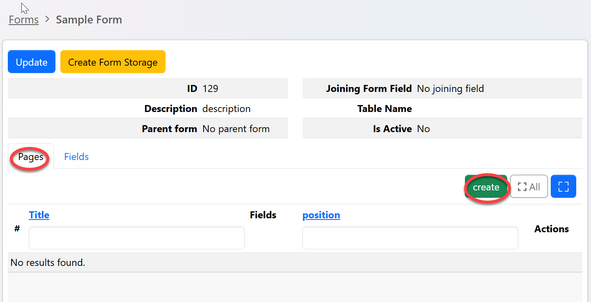
From the list of forms click on the intended one (or click the "eye" like symbol) to open the form as shown on the figure below.

User will be directed to the page shown on the figure below where they can access pages and fields.
a) Click on "Create" to create a new page
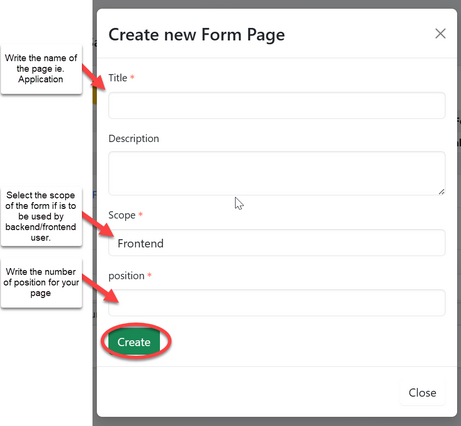
Fill in the required details and click "Create" to save then close. (See figure 3.1(f) below)
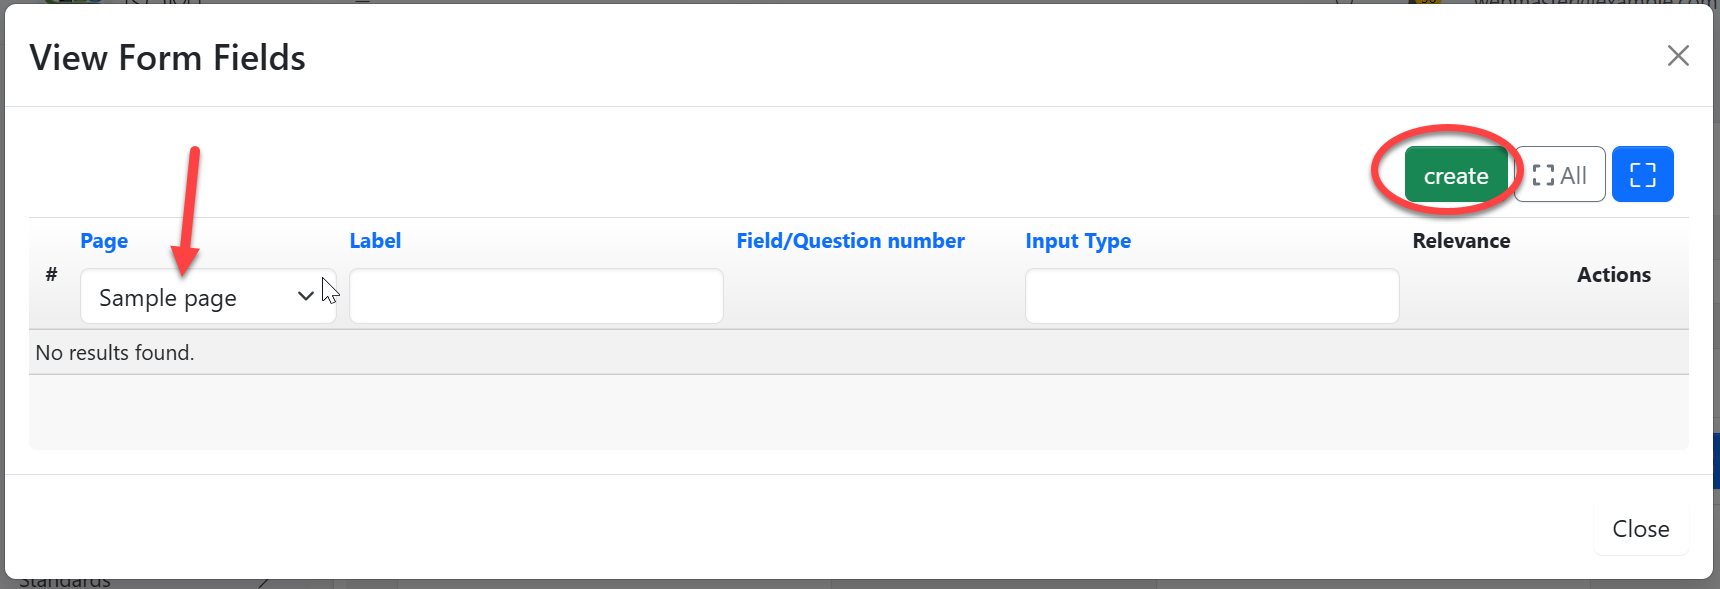
b) To create a field in the page, select the page name as shown with arrow and click "Create" to create a new field.
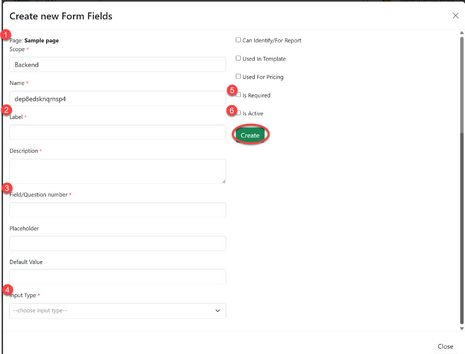
Fill in the required details as
- Scope - Field to appear on frontend / backend user 2) Label. 3) Field number (as they appear). 4)Select input type (data type). 5)Check "Required" if the field is mandatory. 6)Check "Is Active" to activate the field. Then click "Create" to save as shown on the figure 3.1(h) below.
3.1.3 Activating Forms
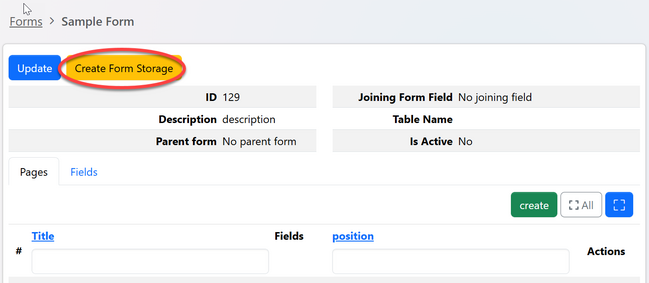
From the list of forms, the created form will appear with the red x (see figure 3.1(i) below) To activate click on the form or "eye" like symbol to open the form.

Click on the "Create form storage" to activate the form
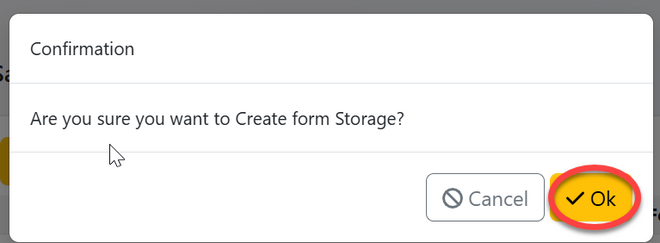
Click "Ok" to confirm.
3.2 Field Type
Refers to the specific kind of input field used in a form to capture user data. Different types of form fields have been designed to collect various types of information, (as from applications).
Click here for a more detailed explanation of field types
4. Component Management
4.1 Creating Process Component
A process is made up of various components which are known as stages. The stages depend on one another to function. In iSQMT we have four major components used to create a process structure.
- Application - Handle the submission and storage of application data
- Review -Manages the review process of submitted applications
- Payment -Manages the payment process after an application is approved.
- Signature -Facilitates the authorization and signing of the documents within the process.
4.1.1 Creating Process
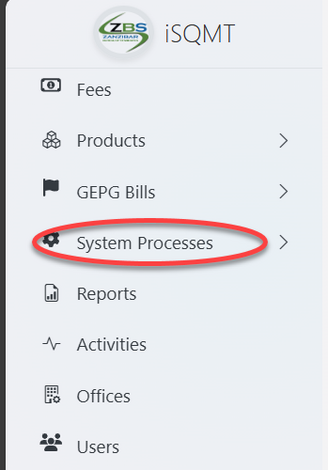
From the list of menus on the left click on "System Process" see figure 4.1(a) below.
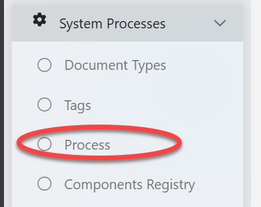
Then click on "Process" see figure figure 4.1(b) below.
From the list of processes click on "Create" button situated on the middle right, see figure 4.1(c) below.

Fill in the required details as shown on the figure 4.1(d) below then click "Create" to save.

4.1.2 Adding Stages
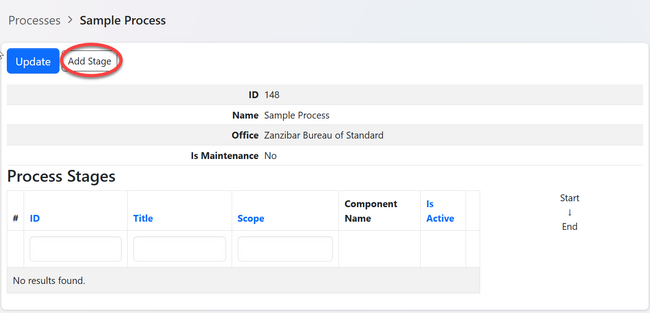
Upon successful creation of the process, user will be landed to the page below, where will be supposed to create stages. For having a functioning process user need a minimum of one stage which is application.
Click "Add Stage" as shown below.
Fill in the required details and click "Save" as shown below.
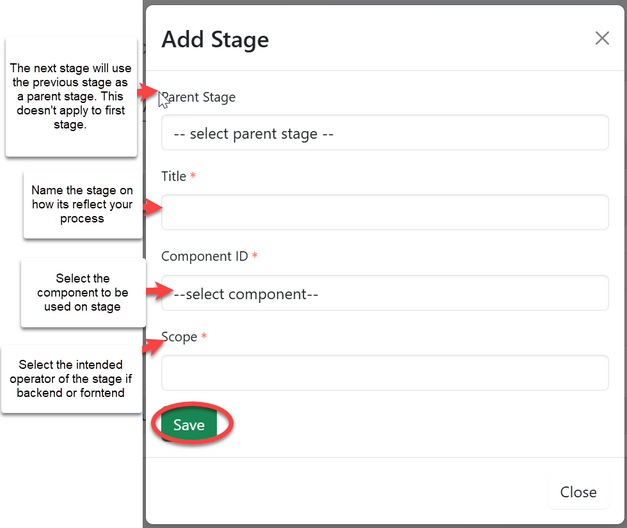
Do this for all stages to complete the process.
Once the stages arrangement is created, it can never be edited. The system will allow user to update only names of stages.
4.2 Process Configuration
For a process to work it require the combination of process structure (the one we have created on the previous stage), office, roles, forms and authorization (signatures).
In configuration we do combine all of those items together on the defined document type as follows;
- Defining Document type.
From the menu on the left click on the "system process" the click "Document type"
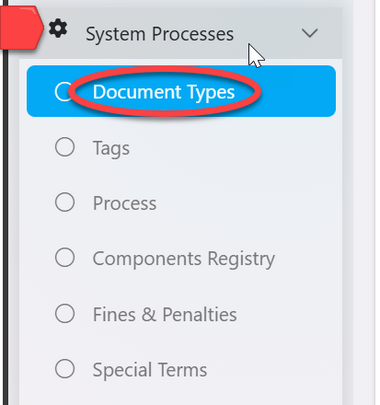
From the list of document types click on "Create"
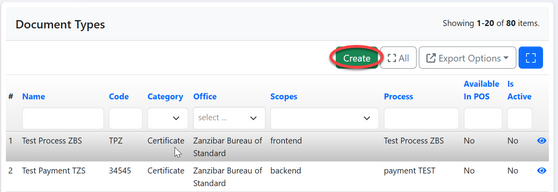
Fill in the required details as shown below.
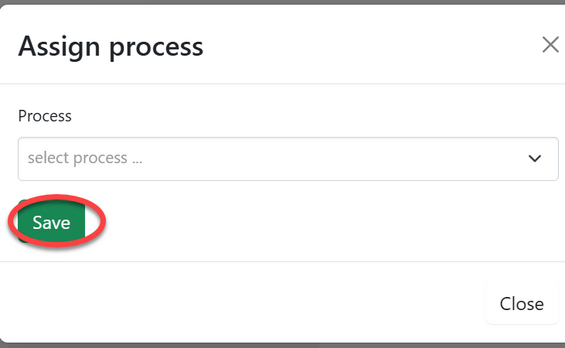
2. Assign Process On the document type instance created assign the process by clicking "Assign process" as shown on the figure 4.2(c) below;
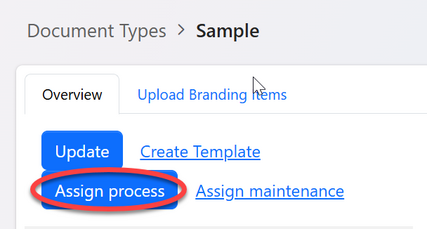
Or From the list of document type click the one you have created it will return a menu as shown below, Click on the "Process Config"

on the appeared page

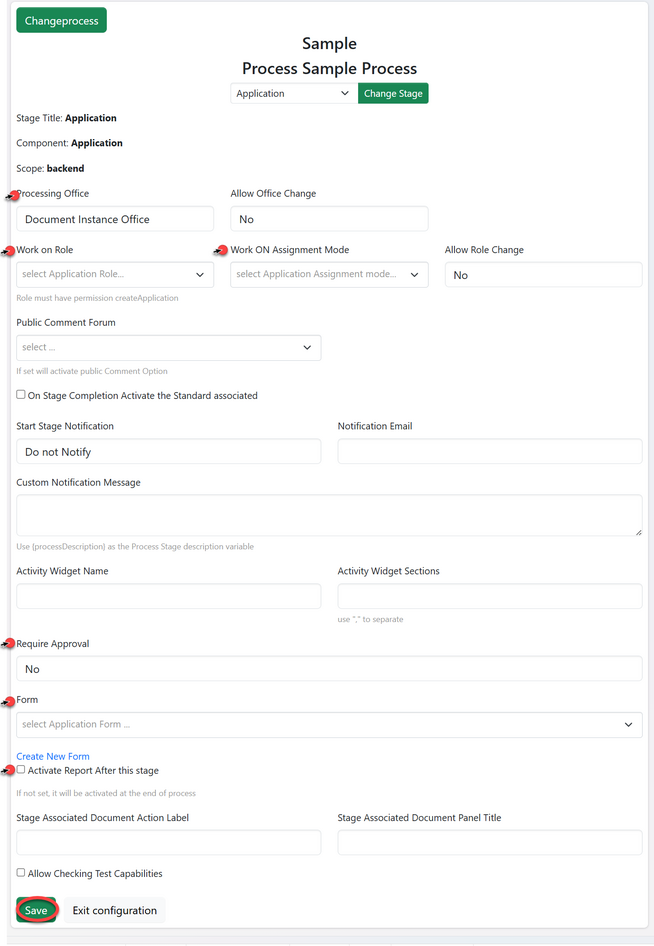
1) Change process - this is equal to assign process
2) Select stage (component) of the process to be configured.
3) Change stage - Click this button to access all the configuration.
4.3 Process Templates
From the list of documents types click on the intended process, On the menus appeared click "Create Template" as shown on the figure 4.3(a) below.

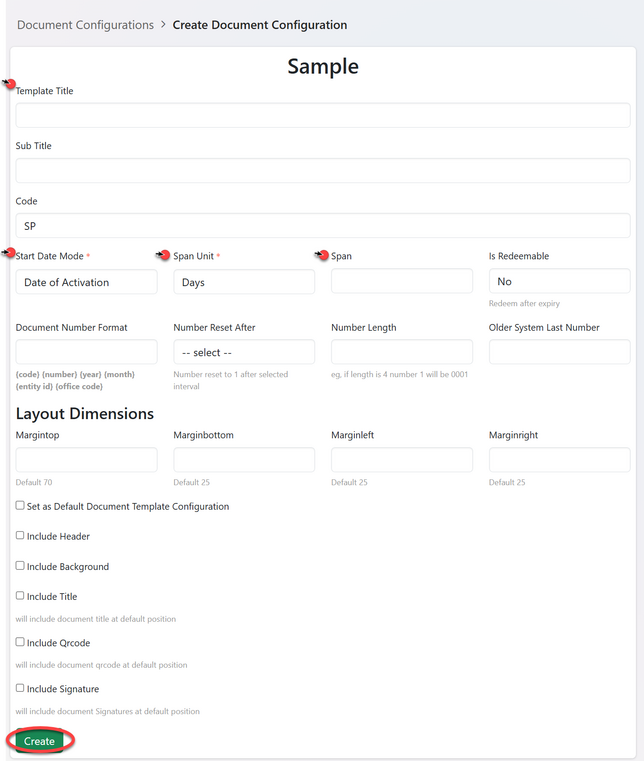
Fill in all the required details as shown below and click save.
Pointed are the important details to be filled
Upon successful creating the template, a page below will pop-up where user will click "Add template" to edit the template.
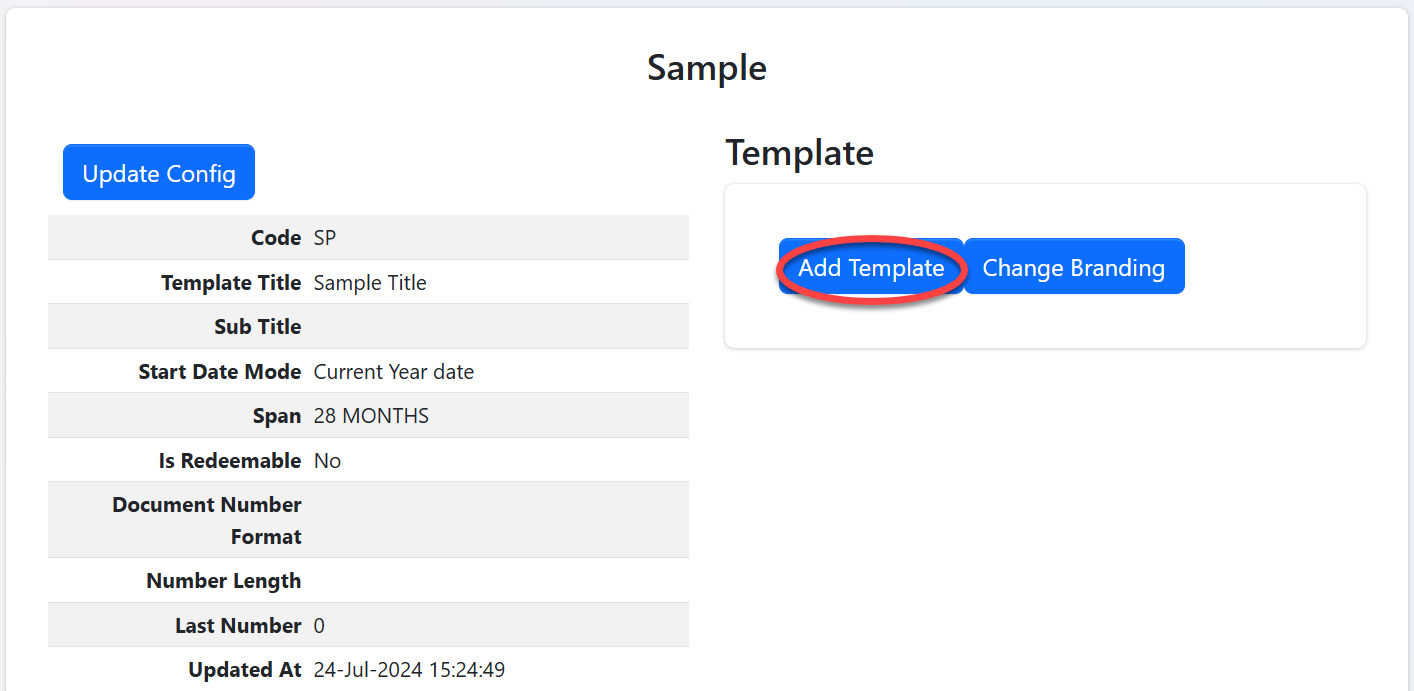
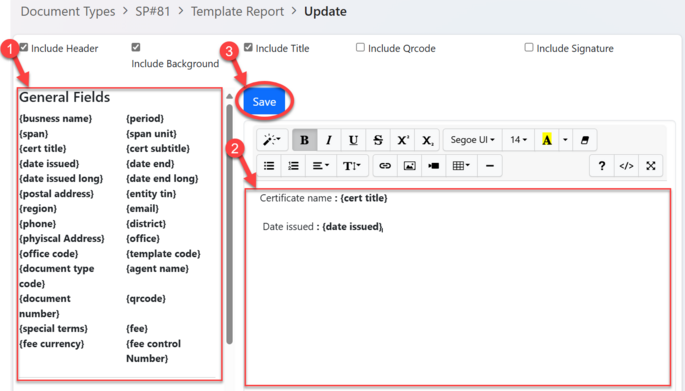
User will be landed on the page with;
1) Field Variables - These fields comprises of different variables used in processes stored in the system. User will copy/write the variables on the textbox on the right side (as per the format shown with the arrow 2.) Then after click "Save".
Updating template
User can edit the template by clicking "Update Template" as shown on the figure below.

4.4 Fee Configuration
iSQMT facilitates fee management by allowing pre-configurations that enables process owners to define payment amounts within their processes. These fees are managed through the "Context" component, which assigns the specified fee accordingly. Below are the main aspects of fee configuration.
- Defined fee context - System created.
- Create fee and assign fee context - Process owner defined
- Associate fee item with the process - Administrator Configuration
4.4.1 Creating Fee Item
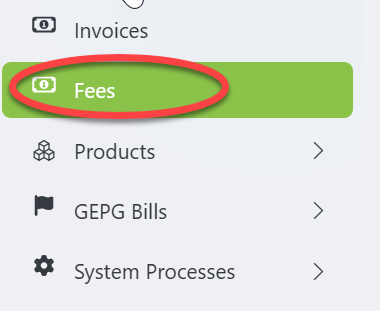
From the list of menus on the left click on "Fee"
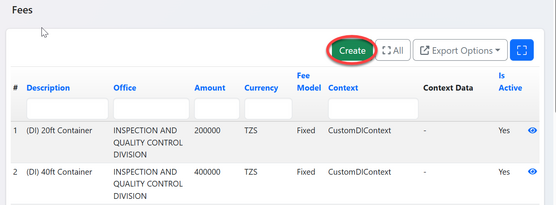
From the list of fees click on the "Create" to create new fee.
Fill in the required details and click "Save"
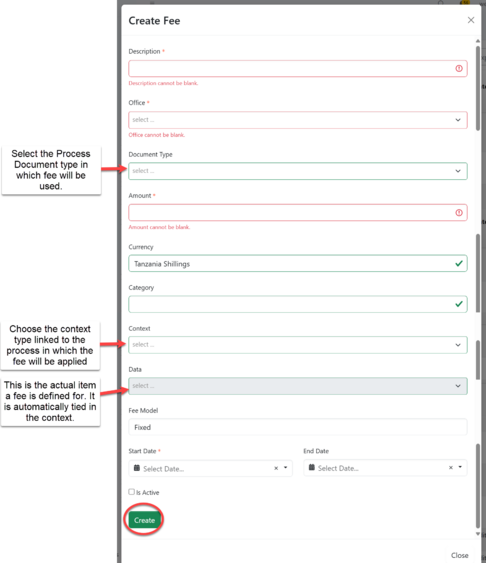
Updating fee
Changes on fee can be edited by clicking on the fee intended and click on "Update" button.(See the figure 4.4(d) below )
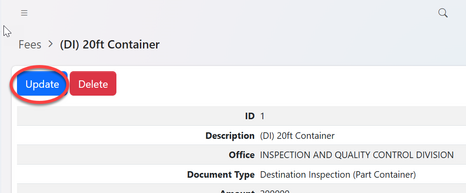
4.4.2 Associating fee on process
From the list of processes document types click the process intended for configuration.
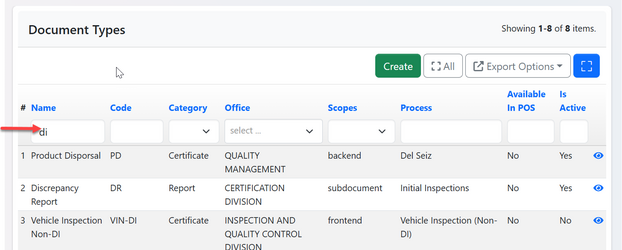
On the page with options click on "Process Config" see figure 4.4() below

User will be landed on the configuration page, on stages select "Payment" stage as pointed with arrow and click "Change Stage" (See figure 4.4()below)

On the configuration page, proceed with the fee configuration as shown on the figure 4.3 () below.
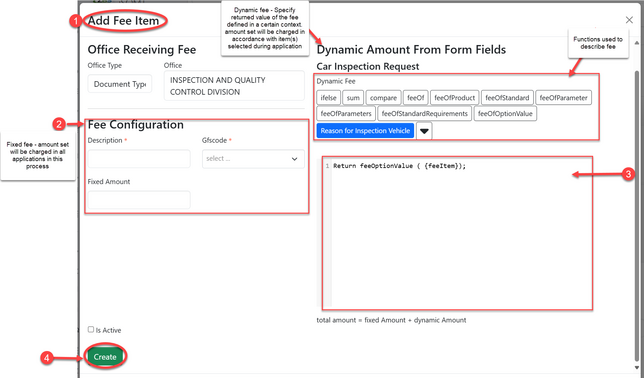
- Click on the "Add Fee Item" to access fee configurations
- For Fixed amount fee - (Not applicable in our processes)
- Dynamic fee configuration - Declare the required function for the fee context
- Tick "is active" box for activation and click "Create" to save.
By completing that configuration, the fee will be already associated with the process.
** ** **
